DIY absorption refrigerator, ever heard of it? If you’re a homeowner looking to reduce your carbon footprint and save some money, this may be the perfect project for you. In this article, we’ll explore the world of absorption refrigeration, compare it to traditional vapor-compression systems, and guide you through the process of building your very own eco-friendly fridge. So, let’s dive in, shall we?
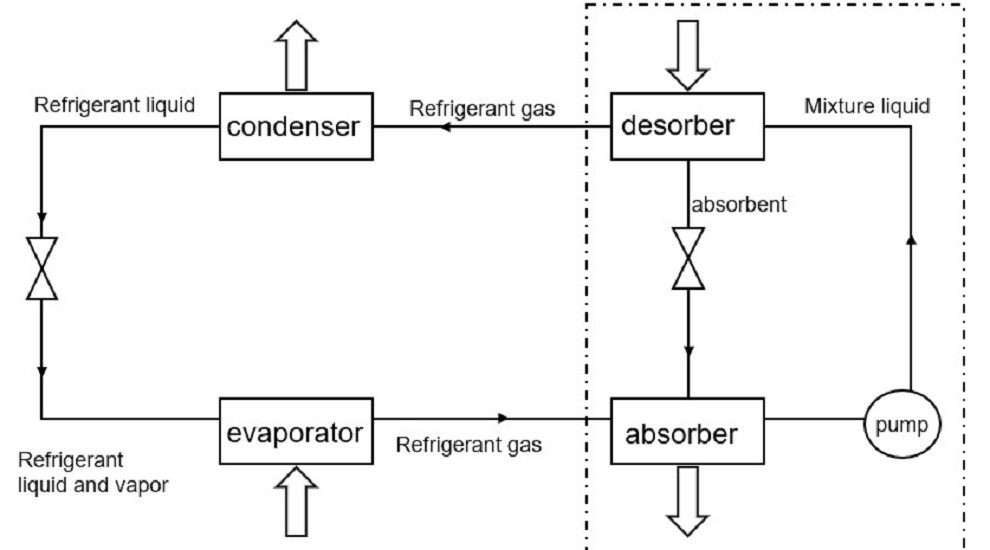
Table of Contents
What is an Absorption Refrigerator?
Imagine a fridge that runs on heat instead of electricity. Sounds like magic, right? Well, that’s absorption refrigeration for you!
Basics of Absorption Refrigeration
It’s a technology that’s been around since the 1800s, using heat to move a refrigerant through a cycle of evaporation and absorption, effectively cooling the inside of the fridge. Pretty cool, huh?
Advantages and Disadvantages
So, why isn’t everyone using absorption refrigerators? Well, they’re generally less efficient than traditional vapor-compression systems, but they have their perks – they’re quiet, vibration-free, and can run on alternative energy sources like solar or gas.
Comparing Absorption Chillers and Vapor-Compression Refrigerators
Key Differences
While vapor-compression systems use mechanical compressors to move refrigerant around, absorption systems rely on a heat-driven process. This means no moving parts, resulting in a whisper-quiet operation.
Energy Efficiency
When it comes to energy efficiency, vapor-compression systems usually win. However, with a well-designed DIY absorption refrigerator, you can still achieve respectable efficiency – especially if you’re using renewable energy sources.
To read more indepth articles, click here: Absorption Refrigeration: Easy Guide to Understanding It
Absorption Refrigerator DIY: Building Your Own
Gathering Materials and Tools
Required Materials
Ready to start building? You’ll need an evaporator, absorber, generator, condenser, expansion valve, refrigerant, and absorbent. We’ll explain these components in the next section.
Essential Tools
As for tools, you’ll need a pipe cutter, pipe bender, wrench, soldering iron, and leak detector. Don’t forget your safety goggles and gloves!
Safety Equipment
Speaking of safety, make sure you have a fire extinguisher and a well-ventilated workspace. Safety first, folks!
Understanding the Basic Components
Now that we’ve gathered our materials and tools, let’s get familiar with the parts of an absorption refrigerator.
Evaporator
The evaporator is where the refrigerant evaporates and absorbs heat from the fridge’s interior, keeping your food cool and fresh.
Absorber
The absorber collects the evaporated refrigerant and combines it with the absorbent, creating a solution that’s ready for the next step in the cycle.
Generator
The generator heats up the refrigerant-absorbent solution, separating them and sending the refrigerant to the condenser.
Condenser
The condenser cools the refrigerant, turning it back into a liquid, and sends it to the expansion valve.
Expansion Valve
The expansion valve controls the flow of refrigerant back into the evaporator, starting the cycle anew.
Refrigerant and Absorbent
Common refrigerants include ammonia or water, while the absorbent can be a salt like lithium bromide. Choose wisely, as different combinations have varying efficiency and safety implications.
Step-by-Step Guide on How to Make an Absorption Refrigerator
Building the Evaporator and Absorber
Start by constructing the evaporator and absorber, making sure they’re properly sealed to prevent leaks. This is where your pipe bending and soldering skills will come in handy.
Constructing the Generator and Condenser
Next, build the generator and condenser, ensuring they’re well-insulated and connected to the appropriate heat source. Don’t forget to attach a vent for the waste heat!
Assembling the Expansion Valve
Now, assemble the expansion valve and connect it to the evaporator and condenser, making sure the flow of refrigerant is properly regulated.
Connecting the Components and Adding Refrigerant
With all the components in place, connect them using pipes and fittings, ensuring a tight seal. Finally, add the refrigerant and absorbent, and voila! Your DIY absorption refrigerator is ready to go.
Testing and Fine-Tuning
Before you start celebrating, test your fridge for leaks and cooling efficiency. Fine-tune the system as needed to achieve optimal performance.
Absorption Chiller DIY: Alternative Applications
What is an Absorption Chiller?
Absorption chillers work on the same principle as absorption refrigerators, but they’re used to cool larger spaces or provide air conditioning. Intrigued? Let’s learn more.
Basics of Absorption Chiller Systems
Absorption chillers are large-scale cooling systems that use heat-driven processes to produce chilled water, which is then circulated through an HVAC system to cool a building.
Advantages and Disadvantages
Like absorption refrigerators, absorption chillers are quiet, vibration-free, and can run on alternative energy sources. However, they’re also less efficient than their vapor-compression counterparts.
DIY Absorption Chiller for Cooling Applications
Materials and Tools Needed
Building a DIY absorption chiller requires similar materials and tools to an absorption refrigerator, just on a larger scale.
Building the Absorption Chiller
Construct the evaporator, absorber, generator, condenser, and expansion valve following the same principles as building an absorption refrigerator. Scale up the components to accommodate the larger cooling capacity.
Integrating the Chiller into an HVAC System
Once you’ve built your absorption chiller, connect it to your existing HVAC system to circulate the chilled water and provide cooling throughout your home.
Troubleshooting and Maintenance
Common Issues with DIY Absorption Refrigerators
Insufficient Cooling
If your fridge isn’t cooling properly, check for leaks, blockages, or an ineffective absorption process. Adjust and repair as needed.
Leaks and Blockages
Inspect your system for leaks or blockages in the pipes and fittings. Repair or replace any damaged components to ensure optimal performance.
Ineffective Absorption Process
If your absorption process isn’t working efficiently, consider swapping out your refrigerant and absorbent for a different combination or adjusting the heat source to improve performance.
Regular Maintenance and Upkeep
Inspecting for Leaks
Periodically inspect your DIY absorption refrigerator for leaks, using a leak detector to identify any problem areas. Fix any issues promptly to keep your fridge running smoothly.
Cleaning and Flushing the System
Regularly clean and flush your system to remove any build-up or contaminants that may affect performance.
Replacing Components as Needed
Over time, some components may wear out or become less effective. Replace them as needed to ensure your absorption refrigerator continues to function efficiently.
Safety Precautions and Environmental Considerations
Safe Handling of Refrigerants and Absorbents
Toxicity and Flammability
Some refrigerants and absorbents can be toxic or flammable. Always handle these materials with care and follow proper safety guidelines.
Proper Storage and Disposal
Store and dispose of refrigerants and absorbents according to local regulations to prevent harm to the environment and human health.
Ventilation and Air Quality
Ensuring Proper Ventilation
Always work on your DIY absorption refrigerator in a well-ventilated area to prevent the buildup of harmful gases.
Monitoring Indoor Air Quality
Monitor the air quality in your home to ensure your absorption refrigerator isn’t contributing to poor indoor air conditions.
Energy Efficiency and Sustainability
Choosing Energy-Efficient Components
Select energy-efficient components for your DIY absorption refrigerator to minimize your environmental impact and save on energy costs.
Incorporating Renewable Energy Sources
Consider using renewable energy sources, such as solar or geothermal, to power your absorption refrigerator and reduce your carbon footprint.
Conclusion
Final Thoughts on DIY Absorption Refrigerators
Assessing the Feasibility of a DIY Project
Before embarking on a DIY absorption refrigerator project, consider your skills, budget, and available resources. It may be a challenging undertaking, but the environmental benefits and satisfaction of creating something yourself can be well worth it.
Understanding the Limitations and Potential of Absorption Refrigeration Systems
While absorption refrigeration systems have their limitations, such as lower efficiency compared to vapor-compression systems, they offer unique advantages like quiet operation and the ability to run on alternative energy sources. Embrace the challenge and enjoy the rewards of building your own eco-friendly cooling solution.