In this article, we’ll guide you on how to adjust expansion valve, ensuring that you can achieve optimal performance from your HVAC system.
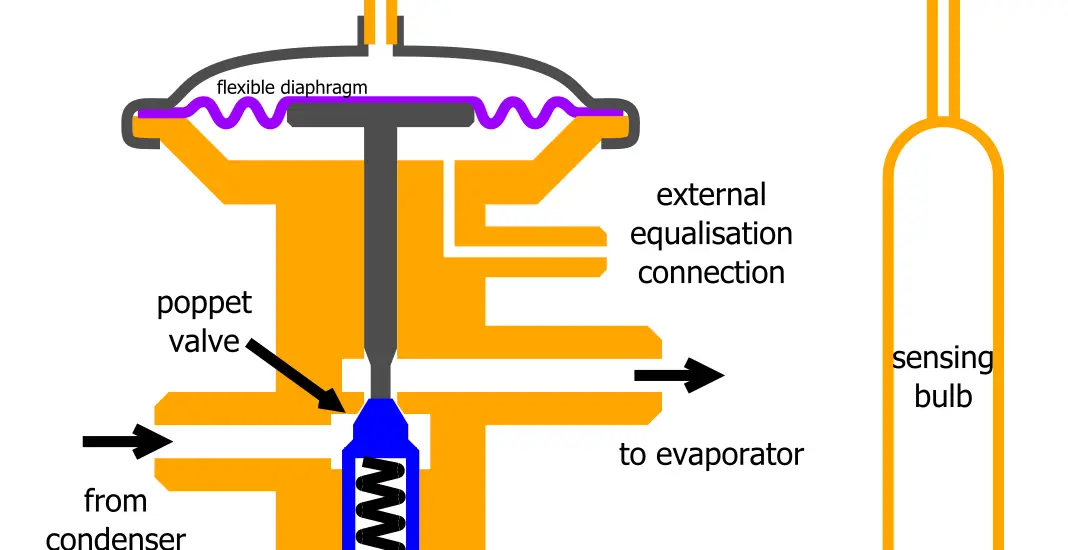
Table of Contents
Steps on How to Adjust Expansion Valve
The steps below will guide you on how to adjust expansion valve:
Step 1: Safety Precautions
Safety is paramount when working with HVAC systems. Before starting, make sure to:
Turn off the System: Shut down the HVAC system and unplug it from the electrical outlet to avoid any electrical shock.
Wear Protective Gear: Use gloves to protect your hands and safety goggles (e.g. the Uvex Ultra-Spec 2000 Visitor Specs Safety Glasses on Amazon) to protect your eyes from any debris or refrigerant splashes.
Ensure Good Ventilation: Work in a well-ventilated area to avoid inhaling any harmful fumes.
Read Manufacturer’s Guidelines: Consult your system’s manual to understand any specific safety instructions and warnings.
Adhering to these precautions will help you work safely and effectively.
Step 2: Identify the Type of Expansion Valve
The type of expansion valve determines the adjustment method, so proper identification is crucial. There are primarily two types of expansion valves you might encounter: standard (or capillary) and thermostatic. Here’s how to identify them:
Consult the System’s Manual: Your HVAC system’s manual should have detailed information about the type of valve installed. Look for specifications, diagrams, or terms like “capillary” or “thermostatic.”
Visual Identification: Inspect the system visually to determine the type of expansion valve it uses.
Thermostatic Expansion Valve (TXV): TXVs are more complex and include a temperature-sensing bulb attached to the valve. The bulb monitors the temperature and adjusts the refrigerant flow accordingly. You’ll typically find this bulb clamped to the suction line near the evaporator.
Standard Expansion Valve: This valve might have a simple design without any attached temperature-sensing bulbs. It usually relies on a fixed orifice and can be recognized by a needle-like adjustment screw.
Seek Professional Guidance if Needed: If you are unable to identify the type of valve through the manual or visual inspection, don’t hesitate to consult with a licensed HVAC technician. Incorrect identification can lead to improper adjustments, potentially harming the system.
Step 3: Locate the Expansion Valve
Finding the expansion valve is crucial for the adjustment process. Here’s how to locate it:
Consult the Manual: Check your HVAC system’s manual to find a diagram or description of the valve’s location.
Look Near the Evaporator: The expansion valve is typically located near the evaporator coil. Look for labels or distinctive features.
Identify Valve Type: Note whether it’s a standard or thermostatic valve, as this will affect the adjustment process.
Proper identification will ensure that you adjust the correct component, avoiding potential damage to the system.
Step 4: Accessing the Valve
Once located, you’ll need to access the expansion valve. Follow these steps:
Remove Necessary Covers: Depending on your HVAC model, you may need to remove screws or panels. Use appropriate tools, such as a screwdriver or wrench.
No matter the type of screw used, this Amazon-listed Amartisan 22 IN 1 Ratchet Screwdriver Set will help you remove your HVAC cover.
Store Removed Parts: Keep screws and removed parts in a safe place so that they can be easily reassembled later.
Clear the Workspace: Ensure you have unobstructed access to the valve, carefully moving any wires or components aside if needed.
Taking care to properly access the valve will facilitate a smooth adjustment process.
Step 5: Adjusting the Valve
Adjusting the valve is a delicate process. Follow these detailed instructions:
Identify Adjustment Screw: Look for the screw that controls the flow of refrigerant; it may be marked on the valve.
Use the Right Tool: Typically, a wrench is used for standard valves, while thermostatic valves might require specialized tools.
Make Gradual Adjustments: Turn the screw or bulb slowly, observing the system’s response. Clockwise turns reduce flow, while counterclockwise increases it.
Patience and care are required during this step to ensure that the system functions optimally after adjustments.
Step 6: Testing and Finalizing
After adjusting, it’s crucial to test the system:
Reassemble: Replace any covers or panels removed earlier, using the stored screws and parts.
Turn on the System: Restore power and observe the cooling performance, checking for any unusual sounds or behaviors.
Make Further Adjustments if Needed: If the system isn’t performing as expected, repeat the adjustment process as necessary.
This final step ensures that the adjustments made are correct and that the system is operating as intended.
Check out these other related articles…
Types of Expansion Valve in Refrigeration System: Easy Guide
Thermostatic Expansion Valve in a Refrigeration System: Easy 411 Guide
Thermostatic Expansion Valve Working Principle: Easy Guide
Car AC Expansion Valve Noise: Easy Diagnosis & Repair
Expansion Valve Hissing Noise: 4 Steps to Diagnose & Fix
Why Should You Adjust the Expansion Valve?
Adjusting the expansion valve ensures proper cooling and energy efficiency. If the valve is not adjusted properly, it can lead to issues like inadequate cooling or even system failure.