Proper expansion valve adjustment can significantly enhance system efficiency, and with this guide, you’ll master the techniques, even if you’re new to the process.
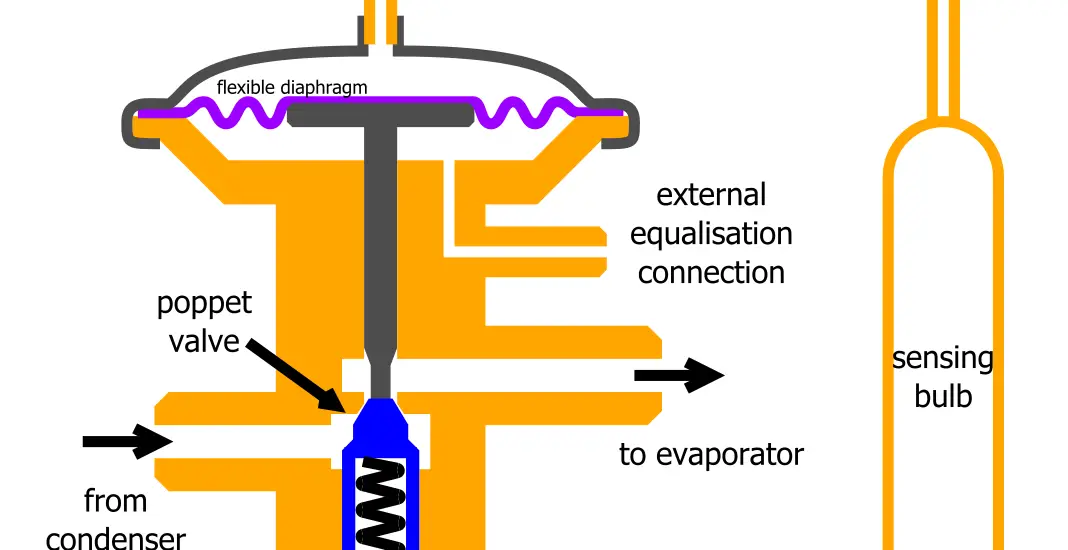
Table of Contents
Step-by-Step Guide to Expansion Valve Adjustment
Expansion valve adjustment is an integral part of ensuring that your HVAC system functions optimally. While it might sound technical, the process can be quite straightforward when broken down step by step. Here, we’ll walk through every step, ensuring that even those new to HVAC systems can confidently tackle this adjustment.
1. Safety First
Your safety is paramount. Before initiating any procedure on the HVAC system, ensure that the entire system is powered off. This step is essential to prevent any electrical shocks and accidental system startups. If your system has a dedicated breaker in the electrical panel, consider turning it off for an added layer of safety.
2. Locate the Expansion Valve
The expansion valve is a critical component, but it’s just one part of a larger system. To locate it, look near the evaporator coil. This valve might resemble a small brass component with a couple of pipes or tubes connected to it. If you face challenges while identifying, the user manual for your specific HVAC model will typically have labeled diagrams that can guide you.
3. Understand the Current Setting
Before you start turning or adjusting anything, it’s crucial to determine the valve’s current setting. This foundational knowledge ensures that, if needed, you can always return to the original configuration. Most valves will have some form of indicator or scale—this could be a series of markings, numbers, or notches. Take a note or a quick picture to remember this original setting.
4. Make the Adjustment
Here’s where the real action starts. Using a suitable tool, often a wrench (or sometimes a tool provided by the system’s manufacturer), you’ll adjust the valve. But remember, small movements can have significant impacts:
Clockwise Turn: Typically increases the refrigerant’s flow. This might be needed if you feel your system isn’t cooling as effectively as it should.
Counter-Clockwise Turn: This usually decreases the refrigerant’s flow. This adjustment can be beneficial if your system seems to be over-cooling or if the evaporator coils freeze often.
Always make adjustments in small increments. After a slight turn, give the system some time to react before deciding if further adjustments are needed.
This WORKPRO 2-piece Adjustable Wrench Set on Amazon can help you carry out this task.
5. Test the System
After tweaking the valve, don’t finalize the setting immediately. Power the HVAC system back on and allow it to run for a short period. This test lets you evaluate the changes in real time. You’re listening for any unusual noises and, more importantly, feeling for changes in cooling efficiency. Remember, patience is crucial here. Achieving perfection might require a few rounds of minor adjustments.
6. Finalize the Setting
Once you’ve struck the balance and are satisfied with the cooling performance, it’s time to finalize the adjustment. Most expansion valves come with some lock mechanism, like a nut or a guard. By securing this, you ensure that the setting remains unchanged, preventing any accidental adjustments.
Check out these other related articles…
Expansion Valve in AC: Your Comprehensive Guide
Electronic Expansion Valve: Your Easy Guide
Expansion Valve Types: Your Comprehensive Guide
Expansion Valve in Refrigerator: Your Easy 101 Guide
Expansion Valve Function: Easy 101 Guide
Why Adjusting the Expansion Valve is Essential
Proper expansion valve adjustment is crucial for several reasons:
Efficiency: An optimally adjusted valve ensures that the right amount of refrigerant enters the evaporator, preventing wastage and ensuring efficient cooling.
System Health: Incorrect settings can stress other components, like the compressor, leading to premature wear or system breakdown.
Cost Savings: When your system runs efficiently, it uses less energy, leading to reduced utility bills.
Comfort: Correct adjustment ensures that your living or working spaces reach desired temperatures consistently.