Knowing how to clean fridge compressor coils is a critical aspect of maintaining your fridge’s efficiency and longevity. It’s not a complex task, but it does require a careful approach. Cleaning the compressor coils not only helps your fridge run more smoothly but can also save you a good deal on energy bills. Let’s embark on this journey to understand the why and how of cleaning fridge compressor coils.
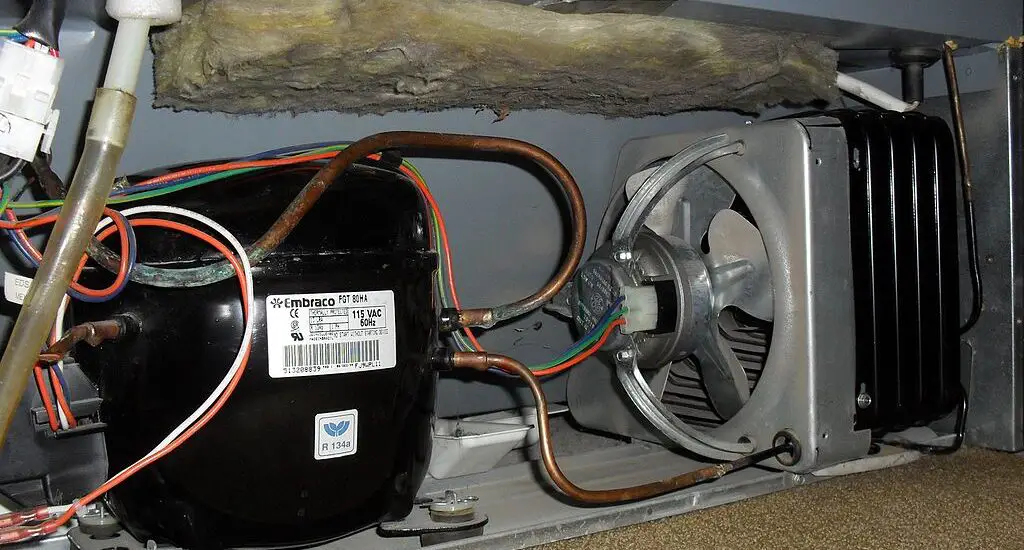
Table of Contents
The Importance of Cleaning Fridge Compressor Coils
Fridge compressor coils play a significant role in the cooling mechanism of your refrigerator. Over time, they tend to accumulate dust, dirt, and grime, which can impact their efficiency. Picture your fridge during those hot summer days, straining to keep your food and drinks chilled. If the coils are dirty, they’ll have to work even harder, increasing your fridge’s energy consumption and potentially hiking up your electricity bill. Cleaning these coils will ensure that your fridge runs efficiently and keeps those energy costs in check.
Brief Overview of the Cleaning Process
Cleaning fridge compressor coils involves a few simple steps that any DIY enthusiast can handle. First, you’ll need to gather the necessary tools – a coil cleaning brush, a vacuum cleaner with a brush attachment, and a microfiber cloth. Once you’re all set, you’ll need to unplug your fridge (safety always comes first), locate the coils, give them a thorough clean, and put everything back in order. Then, it’s just a matter of testing your fridge to make sure it’s running smoothly.
Understanding the Fridge Compressor Coils
Before we discuss cleaning the coils, what really are the fridge compressor coils? This section will explain this.
What Are Fridge Compressor Coils?
Fridge compressor coils, often found at the back or underneath your refrigerator, play a key role in the cooling process. You can think of them as the ‘lungs’ of your fridge. They’re responsible for dissipating the heat that’s extracted from the inside of your fridge, helping to keep your food and drinks cool. They’re usually made of metal and come in a serpentine structure.
How Do Fridge Compressor Coils Work?
It’s fascinating how these metal coils contribute to the cooling process of your fridge. When your fridge is powered on, the compressor starts compressing the refrigerant, which becomes hot in the process. This hot refrigerant passes through the coils, which dissipates the heat into the surrounding air. As the refrigerant cools down, it’s cycled back into the fridge to absorb more heat, and the process repeats. If the coils are covered in dirt or dust, they won’t be able to release this heat efficiently, which is why cleaning them is so vital.
Why Do Fridge Compressor Coils Need Cleaning?
Just like a central air conditioning unit, fridge compressor coils need to be clean to operate efficiently. Dirt, dust, and grime act as insulators, preventing the coils from releasing heat effectively. Over time, the accumulation of these particles can cause your fridge to work harder to keep cool, consuming more energy and potentially shortening the lifespan of your fridge. Therefore, periodic cleaning of these coils is crucial to ensure the optimal performance of your refrigerator.
How to Clean Fridge Compressor Coils: Step-by-Step Guide
In this section, we’ll show you how to clean your fridge compressor coils.
Gather Required Tools
First things first, you’re going to need some tools to tackle the task. Nothing too fancy, just a vacuum cleaner with a brush attachment, a specialized coil cleaning brush (found at your local hardware store or online), and a microfiber cloth. Gloves are optional, but it’s not a bad idea to protect your hands from the dust and dirt you’ll be dealing with.
List of Tools
Here’s the toolkit you’ll need:
1. Vacuum cleaner with a brush attachment
2. Coil cleaning brush
3. Microfiber cloth
4. Gloves (optional)
Why Each Tool is Needed
The vacuum cleaner and brush attachment are for removing loose dust and dirt from the coils. The coil cleaning brush, which is longer and thinner than regular brushes, is for reaching the hard-to-access areas and dislodging stubborn grime. Finally, the microfiber cloth is for wiping down the area after cleaning, ensuring it’s as dust-free as possible.
Safety Precautions Before Starting
Okay, you’re all set with your tools. But before we start, let’s talk safety. We’re dealing with an electrical appliance here, so we need to be cautious.
Unplugging the Refrigerator
The first rule of thumb when working on any electrical appliance is to disconnect it from the power source. So, before you start cleaning the compressor coils, make sure you unplug your fridge. This will keep you safe and protect your fridge from any electrical shorting.
Wearing Proper Safety Gear
Even though it’s not a high-risk task, it’s always good to wear safety gear when performing maintenance tasks. Gloves will protect your hands from any sharp edges, and if you’re sensitive to dust, consider wearing a dust mask or respirator.
Identifying the Fridge Compressor Coils
Now we’re moving to the exciting part – locating the coils. Depending on the make and model of your fridge, the compressor coils can be either at the back or at the bottom.
Different Types of Coils
There are generally two types of coils in a fridge: condenser coils and evaporator coils. The ones we’re interested in are the condenser coils. These are usually black, and their shape resembles a serpentine or radiator-like structure. The evaporator coils are located inside the fridge and are not user-serviceable.
Locating the Coils in Different Refrigerator Models
If your fridge is an older model, the condenser coils are likely on the back. However, most modern refrigerators have the coils at the bottom. They can be accessed by removing the front grill or kick plate at the bottom of the fridge.
Detailed Cleaning Process
With all the prep work done, it’s time to get our hands dirty, literally! Here’s a step-by-step breakdown of the cleaning process.
Vacuuming the Coils
Start by using the vacuum cleaner with the brush attachment to remove loose dust and dirt from the coils. Be gentle to avoid damaging the coils or knocking any wires loose.
Using a Coil Cleaning Brush
Next, use your coil cleaning brush to carefully remove any stubborn grime stuck between the coils. These brushes are specifically designed to fit into the tight spaces between coils, making them perfect for this task.
Applying Coil Cleaning Spray
If your coils are excessively dirty, you might need to use a coil cleaning spray. Spray it according to the instructions on the bottle, then let it sit for a few minutes before wiping it away with a cloth.
Ensuring Thorough Rinse and Dry
Once you’ve cleaned the coils, give them a good wipe with a dry microfiber cloth. This step ensures that all remaining dust and cleaning solution residue is removed.
Reassembling and Testing the Fridge
After everything is cleaned and dried, reassemble any parts you’ve removed, plug the refrigerator back in, and observe if it’s working as expected. The improved efficiency should be noticeable almost immediately.
Check out these other related articles…
Freezer Compressor Humming but Not Starting [Solved]
Refrigeration Compressor Design: The Ultimate Guide
Refrigeration Compressor Working Principle: Your Easy Guide
Refrigerator with Linear Compressor: A Comprehensive Guide
Gas for Fridge Compressor: Your Comprehensive Guide
How Often Should You Clean Your Fridge Compressor Coils?
So, you might be wondering, how often should you actually clean these coils? The recommended frequency is at least once to twice a year. However, if you have pets that shed heavily, or your house is particularly dusty, you might want to do it more frequently.
Troubleshooting After Cleaning the Refrigerator Compressor Coils
The Fridge is Still Not Cooling Efficiently
If your refrigerator isn’t cooling efficiently even after you’ve cleaned the coils, it might be due to other issues. For instance, the problem could be with the compressor, the fan motor, or the thermostat. In such cases, you may need to consult a professional.
Noise from the Fridge Compressor After Cleaning
It’s normal for the fridge to make some noise when it’s working, but if the noise levels increase after cleaning the compressor coils, it might indicate an issue. The problem could be due to the coils not being properly cleaned or because of a damaged part. If the noise continues, you should call in a technician to check it.
Fridge Compressor Coils Are Heating Up
If the coils are heating up more than usual, it could mean that the fridge is overworking. This could be due to a blocked vent or a malfunctioning part. If you notice excessive heat from the coils after cleaning, it’s advisable to seek professional help.
Professional Help for Cleaning Refrigerator Compressor Coils
When to Seek Professional Help
Cleaning the coils is a task you can generally handle yourself, but there are times when you might need professional help. If you’re not comfortable performing the task, if your fridge is still not working properly after cleaning, or if you suspect a more serious issue, then it’s time to call in the experts.
Choosing a Professional Cleaning Service
When choosing a service, look for professionals who are certified, have good reviews, and provide a guarantee for their work. Also, make sure they specialize in refrigerator maintenance and repair. This way, you can ensure that your fridge is in good hands.
