If you’re looking to understand how to test expansion valve in an HVAC system, you’ve come to the right place. Whether you are a seasoned technician or a beginner, this article will guide you through the process.
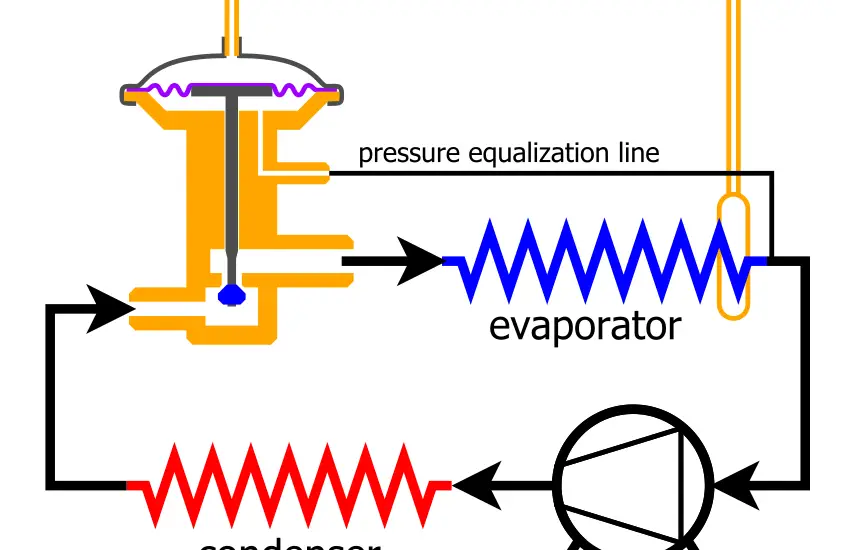
Table of Contents
What You Will Need
Proper testing requires specific tools and equipment. Here’s what you will need:
Thermometer: To measure the temperature at various points. (Etekcity Infrared Thermometer 1080)
Pressure gauges: For monitoring the pressure within the system. (OMT AC Gauges, AC Manifold Gauge Set)
Wrench set: To open and secure fittings and connections.
Safety gear: Including gloves and goggles to protect against potential hazards.
How to Test Expansion Valve: Step-by-Step Instructions
The steps below will guide you on how to test expansion valve:
Step 1: Safety Precautions
Before you begin any work on the HVAC system, safety is paramount. Turn off the entire system using the main power switch, usually found on the unit or circuit breaker panel. Disconnecting the power ensures that the system will not accidentally turn on during testing.
Make sure to wear safety gloves to protect your hands from any sharp edges or components, and goggles to protect your eyes from debris or refrigerant splashes.
Step 2: Locate the Expansion Valve
The expansion valve can be found near the evaporator coil inside the air handler or furnace. You may need to consult your system’s user manual to locate it precisely, as the location can vary between models.
Sometimes, removing screws or unfastening clips might be necessary to access the interior compartments. Keep track of any parts removed to ensure easy reassembly.
Step 3: Connect Pressure Gauges
Connecting pressure gauges is essential for monitoring both the high and low side pressures of the system. Locate the service ports, usually covered with red and blue caps, to connect the gauges. The red port is for high pressure, and the blue port is for low pressure.
Make sure to screw the connections tightly to prevent any leaks, as loose connections could lead to inaccurate readings.
Step 4: Monitor Temperature and Pressure
Once the gauges are connected, turn the system on and let it run for a few minutes to stabilize. You’ll want to observe the pressure readings and compare them to the system specifications.
Using a thermometer, measure the temperature at the inlet and outlet of the expansion valve. This will help you understand if the valve is regulating the refrigerant flow properly.
Check out these other related articles…
How to Clean Expansion Valve: Your Easy 101 Guide
How to Unclog Expansion Valve in 6 Easy Steps
5 Expansion Valve Stuck Closed Symptoms: Easy Guide
Bad Expansion Valve Pressures: A Complete Guide
5 Expansion Valve Stuck Open Symptoms: A Comprehensive Guide
Step 5: Analyze the Readings
With the readings in hand, compare them to the specifications listed in the system’s manual. If you notice significant deviations, it could signal an issue with the expansion valve. An unusually large temperature difference across the valve might indicate a clog or other malfunction.
Conversely, low pressure could suggest a leaking valve. Understanding these readings requires careful observation and comparison to the manufacturer’s guidelines.
Step 6: Replace or Adjust as Needed
If your tests indicate a problem with the expansion valve, you might need to adjust or replace it. Consult the system’s manual for specific instructions on making adjustments, or contact a professional if the task seems too complex.
Replacing the valve requires disconnecting the faulty one and installing a new one in its place, following the manufacturer’s guidelines closely. Make sure to recheck the system’s performance after making adjustments or replacements to ensure the problem has been resolved.