Are you looking for why your GE refrigerator quit working? While it is becoming an increasingly common problem, it should not be so. Let us discuss how to fix the problem.
Table of Contents
GE Refrigerator Quit Working – Solutions
Do the following to troubleshoot and solve the problem of a GE refrigerator that quit working:
1. Replace the Power Cord
Pull the cord out of the wall outlet and check it to see if it has burn marks. If there are such marks, replace the cord.
But if there are no burn marks, push the cord into the outlet fully and properly. Then, check to see if the internal light of the unit is working well. This will tell you if the problem is with the cord or the outlet.
If the light is not working, plug another appliance into the same wall outlet. If you find power in the appliance, it means the cord is definitely the problem. So, replace it.
You will find the right type of cord for your refrigerator model in trusted parts outlets. Otherwise, contact GE to buy one.
However, if you don’t find power in the appliance, then you know the outlet is faulty. Therefore, relocate the refrigerator or change the outlet.
Additionally, the problem could stem from low voltage. You may have to find a certified electrician to take a look at your connections. Then, they will be able to determine if there is a fault, causing the GE refrigerator to quit working, and fix it.
2. Adjust the Temperature Controls
If you accidentally turn off the controls for the temperature, the refrigerator won’t work anymore. The lights may come on but it won’t cool at all.
Therefore, check the controls to see if they are on. If you are not sure what they would look like when on, consult the user manual for the refrigerator.
But if you find that the controls are set properly, then there is a chance they have stopped working. To be sure, unplug the refrigerator from the wall outlet and remove the cover over the controls.
Next, look closely at the controls. There is a plug that connects the controls of the refrigerator and freezer. Disconnect the plug and plug the refrigerator back into the wall outlet.
If you find that the unit resumes working after doing this, the controls have gone bad and should be replaced.
3. Replace the Fan Motors
There are two important fans in every refrigerator: the condenser fan and the evaporator fan. Let us start with the condenser fan.
You will find it close to the compressor, at the rear bottom of the unit, behind a panel. Remove the panel to access the fan. Spin the blades with your hand to see how well they spin.
If there is any restriction to their movement, it is a pointer to a fault with the motor. The bearings are probably worn.
To be doubly sure, take a multimeter and run a continuity test on the motor. If you don’t find continuity, the motor is definitely defective. Replace it.
The fan pulls air through the condenser coils and takes it over the compressor to cool it. This way, the compressor does not overheat.
However, if the motor of the fan fails, the compressor may overheat and have a hard time working smoothly. Consequently, the refrigerator will quit.
Now, to the evaporator fan…
Open the door of the freezer compartment and empty the compartment. Next, take the back panel out of the way to access the evaporator and fan.
Now, spin the blades by hand. If everything is working as it should, you should find the blades spinning smoothly. If they don’t, it is possible the motor has failed.
But before deciding on this, take a multimeter and check for continuity in the motor. If you don’t find continuity, replace the motor. Additionally, if the motor is noisier than usual, replace it.
This fan blows air over the evaporator coils to cool the air. Then, it circulates the now-cold air in the freezer. Through the vents, the cold air gets into the refrigerator.
If the motor fails, the fan will stop working. As a result, there will be no cold air moving around inside the unit. This will make it look as if it has quit working.
It is important to note here that some refrigerator models have more than one of these fans. To determine if yours does, check the manual.
4. Dust the Condenser Coils
Dirty or dusty condenser coils affect the ability of a refrigerator, any refrigerator, to work. So, open the bottom back panel of the unit to inspect the coils. If you notice a significant amount of dust and dirt on them, clean them.
Take a leaf cleaner, a vacuum cleaner brush head, or a condenser brush to the coils. Dust them until you remove every trace of dirt.
Next, touch them to see if they feel sticky. If they are, clean them with a damp soapy cloth until the stickiness is gone. Unplug the refrigerator before doing this.
Be sure to clean the coils so they keep working maximally. This is because dirt keeps them from effectively removing heat from the refrigerant that goes through them.
Consequently, the heat transfers to the refrigerator. With time, the refrigerator is likely to stop working because of the heat.
Every 6 or 12 months, check the coils and clean them. And if you have hairy pets, cleaning the coils is even more important.
5. Change the Thermistor
Check the thermistor’s continuity with a multimeter. As you do so, you can also see the resistance coming from it. A properly working thermistor will have its resistance changing if the temperature around it is changing.
So, if you dip it in a bowl of cold water and slowly heat the water, the resistance should change as the temperature of the water changes. If you don’t see this happening, and there is no continuity, the thermistor is dead. Replace it.
The thermistor sends results to the control board, according to what it reads from the temperature in and around the refrigerator. The results enable the control board to send the right amount of power to the cooling system so they can work optimally.
If the component fails, the results would be wrong and every other thing will go downhill from there. This is why you may find that the refrigerator has quit working.
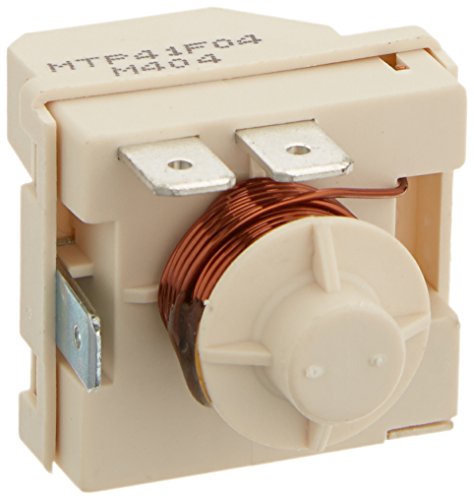
6. Check the Start Relay
Locate the compressor behind the refrigerator, at the bottom close to the condenser fan. Look at the side and you will see the relay. Remove it to run a continuity test on it.
Put a multimeter between its two terminals and see if there is continuity. If there is no continuity, replace the relay. In addition to this, if the relay has a burnt odor or rattles audible when you shake it, replace it quickly.
If the relay becomes defective, you may find the compressor having a hard time running. And without the compressor running smoothly, the refrigerator will not work.
7. Check the Start Capacitor
Not every refrigerator has a start capacitor. But if you notice the capacitor right where you have the start relay, check it for continuity using a multimeter. If you don’t find continuity, replace the capacitor.
The compressor gets a boost of power to start and run from the capacitor. The relay works in conjunction with the capacitor to help the compressor to keep running even when there is an overload.
But if it fails, it is likely the compressor won’t start. But if somehow it starts, it may run only in short bursts. This makes it difficult for the refrigerator to work.
There are other components to check if you find that your GE refrigerator has quit working. They are:
- Temperature control board
- Temperature control thermostat
- Main control board
- Compressor
Run a check on them if you test all the other components mentioned above and they are in good working order.
However, don’t replace any of them first because they rarely fail.
Watch this video to see how a bad main control board affects the refrigerator and how to fix it…
GE Freezer Quit Working – Solutions
Take the following steps to troubleshoot and fix the problem of a GE freezer that quit working:
1. Check the Start Relay
Remove the start relay from the side of the compressor. Do this after unplugging the freezer from the wall outlet.
Next, take a working multimeter and place it between the relay’s start and run terminals. This is to check if there is continuity in the relay. If you find no continuity, replace the relay.
To add to this, if you shake the relay and it makes a rattling noise or there is a burnt smell to it, replace it. It is damaged.
The relay, as small as it is, powers the compressor. In some units, it works together with a start capacitor. However, if it stops working, the compressor is likely not to work. And if the compressor doesn’t work, the freezer won’t work, either.
2. Clean the Condenser Coils
With a vacuum cleaner brush head or a condenser brush, clean the coils. You can also use a leaf blower to perform this task.
When they are clean, be sure to sweep the floor to remove the dust. Otherwise, it will easily adhere again to the coils.
Go a step further to clean the coils by using a damp cloth with a little soap on it. Wipe the coils to remove greasiness. Do this every six or twelve months, especially when there are hairy pets around.
Dirty coils won’t efficiently release heat from the refrigerant as it flows into the freezer. And with excessive heat, the freezer will stop working.
If your freezer is the type that has its condenser coils in the walls of the unit, there is no need to check them.
3. Thaw the Evaporator Coils
You need to inspect the coils first to determine if they have ice or frost on them. Take out the interior back wall of the freezer and check the coils. If there is an ice buildup on them and around the fan, defrost it.
Because you have already removed every item in the compartment when you were going to inspect the coils, simply disconnect the freezer from electric power.
Next, place towels around to catch dripping water and leave the door open. It may take at least 12 hours for the defrost to be complete. So, give it time. The ice on the coils and around the fan will thaw in the process.
There is also the option of using a steamer or hair dryer to melt the ice. But while this method is faster, it is not safe, either for you or the freezer.
Water could drip into the open end of the dryer and cause electric shock. And the heat could melt the plastic parts of the freezer, damaging the unit completely.
The evaporator or cooling coils make air cool as the evaporator fan passes the air over them. If the coils become frozen, there would be no cold air inside the freezer.
Now, the most probable cause of the ice buildup on the coils is a failed defrost system. The components may have failed, leading to the inability of the freezer to go through the defrost cycle.
Therefore, check the components – defrost thermostat, defrost heater, defrost control board, defrost timer – to see which is malfunctioning. Then, replace it.
4. Replace the Evaporator Fan Motor
When you open the door of the freezer, you will see a switch on the door. Press it in order to activate it. Doing this gets the motor running because it stops once you open the door.
However, if the motor fails to resume operation after you activate the switch, it is likely defective. You can go ahead to check for continuity with a multimeter. If you don’t find continuity, replace the motor.
The air that is cooled by the coils behind the freezer wall spreads in the freezer when the fan blows it around. So the freezer gets cold. But if the motor malfunctions, no air wouldn’t spread and the freezer will just be a box.
The above components are the ones that are most likely to cause the freezer to quit working. Nevertheless, they are not the only ones. So check the following components if you test the ones above and find no fault:
- Compressor
- The motor of the condenser fan
- Temperature control thermostat
- User display and control board
- Main control board
In addition to the above, look at the sealed system. One of the ways to know if it has sprung a leak is by checking the freezer shelves. If you find only one cooling, the refrigerant is leaking.
Another way to check is by looking at the evaporator coils. If only one part of the coils has frost or ice on it, it is leaking.
Some freezers can have their refrigerant refilled but many cannot. Besides, it is a deeply technical and expensive process. So you may have to replace the freezer.
However, consult with a professional and certified technician to determine the best approach to this. Contact GE Cares to request service or use an independent agent.
Here is a video showing how to check the defrost system and replace the defrost heater in a GE freezer…
Check out these other articles…
GE Refrigerator and Freezer Not Getting Cold [How to Fix]
No Water from GE Refrigerator [How To Fix]
GE Ice Maker Not Dumping Ice [How to Fix]
GE Refrigerator Problems [How to Fix]
GE Refrigerator Cooling Issues [Fixed]
GE Refrigerator Does Not Make Ice [Quick Fix]
GE Refrigerator Ice Maker Quit Working – Solutions
Solve the problem of a GE refrigerator ice maker that quit working by doing the following:
1. Lower the Freezer Temperature
Check the temperature setting for the freezer section to be sure it is not above 10 degrees Fahrenheit. If the temperature is higher than 10 degrees, adjust it accordingly. The best setting should be between 0 degrees and 5 degrees Fahrenheit.
If the temperature is high, the ice maker won’t produce ice. This is because the machine needs the compartment to get to a certain cold point before it can make ice.
2. Increase the Water Pressure
Try to dispense water from the unit to see if you can fill a cup ¾ of the way within 10 seconds. If you can, the pressure is enough. But if not, increase the pressure.
Contact a qualified plumber to check the pressure and increase it as needed. It needs to be up to 20psi.
If you have a filtration system in your home, it could be affecting the pressure. So consider having a different water line to the refrigerator and ice maker installed, away from the filtration system.
The ice maker is likely not to get water if the pressure is lower than needed. And if there is no water, the ice maker won’t work.
3. Replace the Water Filter
The filter has a direct effect on the water pressure. If the filter is old, damaged, or clogged, it would affect the flow of water to the ice maker.
So if you cannot fill a glass with water ¾ of the way in 10 seconds while dispensing, remove the filter. Then, dispense again and watch the pressure. If it improves, replace the filter.
Additionally, if you have never replaced the filter and it is older than six months, it is affecting the ice maker. Change it.
Get the right water filter for your refrigerator model. Be sure to use the model number and refrigerator type when buying one. Otherwise, you may end up with the wrong type that is useless to you.
4. Change the Water Inlet Valve
If you know the water pressure is enough yet the ice maker is not working or getting water, check the valve’s solenoid. It should have continuity and power. If none of these applies, replace the valve.
The right pressure prompts the inlet valve to close or open as required. This way, it allows water into the ice maker or cuts the flow of water because the ice mold is full.
So if the pressure is low or the valve is malfunctioning, the ice maker won’t be able to function.
5. Get a New Ice Maker
Some parts of the ice maker may fail, causing the ice maker to quit working. So check the parts and if any are faulty, replace them if you can find the individual parts. Otherwise, replace the ice maker.
Recap
Remember, one or more of the following causes a GE refrigerator to quit working:
- Damaged power cord
- Improper temperature setting
- Faulty fan motors
- Defective start relay
- Bad start capacitor
- Dirty condenser coils
- Faulty thermistor
And if it is a freezer or ice maker that quit working, taking the steps listed and explained above will solve the problem.
However, if you find that none works, contact GE Cares to report the problem and request service.
Alternatively, use the chatbox to your right to contact any of our appliance technicians. The best part? You don’t need to make an appointment or have an expensive in-house call.
Disconnect the unit from electric power before troubleshooting or fixing the unit. Doing this keeps you safe from electric shock.