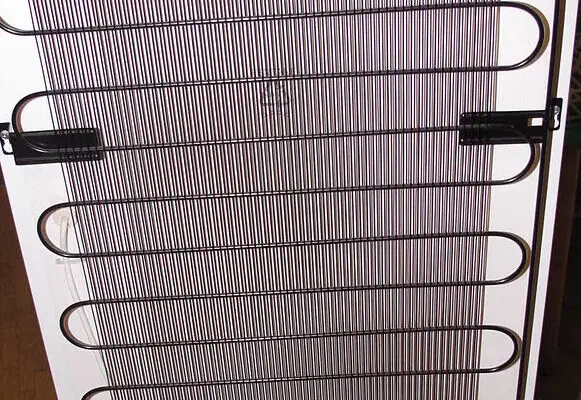
How to clean refrigerator condenser coils – Sounds like a daunting task, right? Well, it isn’t as scary as it seems. And the best part? You’ll reap the benefits of lower energy bills and a longer-lasting refrigerator. We’ll guide you through the process, so stick with us.

Table of Contents
Gather Essential Cleaning Materials
You wouldn’t go into a food fight without some mashed potatoes, would you? Similarly, before you start cleaning, you’ll need some tools.
Recommended Cleaning Supplies
Before we begin our refrigerator rejuvenation, gather the necessary cleaning supplies. Think of them as your fridge’s spa treatment essentials.
Refrigerator Condenser Coil Cleaner
Our first weapon of choice is the refrigerator condenser coil cleaner. It’s like the shampoo at our spa, specially designed to remove dirt without damaging your coils. You can find it at any hardware store or order online.
Refrigerator Condenser Coil Cleaning Brush
Next up, the refrigerator condenser coil cleaning brush. Think of it as a soft-bristle brush that massages the dirt off the coils. These brushes are specially designed to fit in tight spaces between coils.
Compressed Air
Finally, compressed air. Picture it as a refreshing gust of wind that sweeps away any remaining dust. However, use it with caution. Too much pressure could damage your coils.
Safety Materials for Cleaning Refrigerator Condenser Coils
Now, safety first, folks! We’re dealing with some delicate stuff here, so better safe than sorry.
Safety Gloves
Protective gloves are a must. You wouldn’t want to scratch your hands while reaching into those narrow spaces, would you? So get a pair of good quality gloves that provide adequate protection.
Safety Goggles
And don’t forget safety goggles. Just like you’d shield your eyes from the sun, protect them from dust particles that might fly off during the cleaning. Trust us, your eyes will thank you.
Pre-Cleaning Procedures for Refrigerator Condenser Coils
Alright, we’re armed and ready. But before we charge into battle, there are a couple of things we need to do.
Safely Powering Down Your Refrigerator
First, unplug your fridge. Think of it as putting your fridge into sleep mode before surgery. It’s safer for you, and it’s better for the appliance. It’s like the doctor saying, “You’ll feel a little pinch…” before the anesthesia kicks in.
Accessing the Condenser Coils
Now, let’s reveal those hidden coils. You might need to remove the grill or the back panel. Imagine you’re a detective opening a secret door. Behind it lies the heart of the refrigerator, the condenser coils. Ready for some coil-cleaning action?
How to Clean Refrigerator Condenser Coils
Now the fun begins! Roll up your sleeves and let’s show those coils who’s boss.
Using a Refrigerator Condenser Coil Cleaner
First, apply your refrigerator condenser coil cleaner. Imagine it’s like spraying a magic potion that breaks up grime. Spray it evenly across the coils and let it sit for a moment, but not too long! We don’t want to damage anything.
Using a Refrigerator Condenser Coil Cleaning Brush
Now grab your coil cleaning brush. Gently but firmly, brush along the coils. Think of it as brushing your pet’s hair, not too hard, just enough to get out the knots. You’ll see the dust start to loosen and fall away.
Using Compressed Air to Clean Coils
Finally, it’s time to bring out the big gun: your can of compressed air. Aim it at the coils, but remember, not too close! Like a gentle breeze, it’ll sweep away the remaining dust. It’s like you’re blowing away the years, and voila! Your coils are looking young again.
Repeat the Process
Are you still with us? Good! Now, repeat the process until your coils are squeaky clean. A couple of rounds should do the trick. With each pass, you’ll see your fridge getting a new lease on life.
Post-Cleaning Procedures
Great job, your coils are now as clean as a whistle! But wait, we’re not done yet.
Reassembling the Refrigerator after Cleaning
Once the coils are clean, carefully replace any panels or grills you removed. Think of it as tucking your fridge back in after a bath. Make sure everything fits snugly back into place.
Restarting Your Refrigerator Safely
Alright, now it’s time to wake up your fridge. Plug it back in and listen for the gentle hum of a happy appliance. Who knew cleaning refrigerator condenser coils could be so satisfying?
Verifying Effective Cleaning
Finally, check the temperature inside your fridge after a few hours. Is it cooler? It should be. It’s like your fridge just took a deep, refreshing breath.
Check out these other related articles…
How to Test Condenser Fan Motor in 5 Easy Steps
Condenser in Refrigeration System: Your Quick 101 Guide
Refrigerator Condenser Coils Not Hot: Reasons & 4 Sure Fixes
Refrigerator Condenser Fan Noise: 4 Easy Fixes
Refrigerator Condenser Fan Not Running: Fixed in 6 Easy Steps
Maintaining Clean Condenser Coils Over Time
Congrats! You’ve taken the first step towards a more efficient fridge. But remember, this isn’t a one-and-done deal.
Routine Cleaning Schedule for Condenser Coils
Your fridge’s coils need regular TLC. Set a reminder to clean them every six months. Like your regular dentist check-up, it’s something that’s easy to forget but important to remember.
Simple Preventive Measures to Keep Coils Clean
Aside from cleaning, you can take preventive measures too. Keep the area around your fridge clean and free from dust. It’s a small task that goes a long way in keeping those coils clean.
Importance of Regular Maintenance
Remember, regular maintenance can extend your fridge’s lifespan and keep your energy bills down. A little effort can save you a lot in the long run.