Adjusting TXV superheat is a crucial task for maintaining the efficiency of your air conditioning or refrigeration system. If you’re experiencing subpar performance or simply want to optimize your system, this guide has got you covered.
What You’ll Need for Adjusting TXV Superheat
Before diving into the adjustment process, gather the necessary tools and materials to ensure a smooth operation. Here is a list of what you’ll need:
Pressure Gauge: For measuring system pressure (This Yellow Jacket 40345 Blue Single Test Pressure Gauge on Amazon works for R22, R410A, and R404A refrigerants.)
Temperature Probe: To determine the superheat
Adjustable Wrench: To turn the TXV adjustment stem (e.g. this Crescent 4″ Adjustable Black Oxide Wrench on Amazon.)
Safety Gear: Safety gloves and goggles to protect yourself
Steps for Adjusting TXV Superheat
Adjusting TXV superheat is easy when you follow the steps below:
Step 1: Safety First
Nothing is more important than your safety when working with HVAC systems. The first thing you must do is turn off all power to the unit.
You can usually do this by flipping the switch at the circuit breaker or unplugging the system if it’s a portable unit. Confirm the system is off by attempting to turn it on using the thermostat; if it doesn’t power up, it’s safe to proceed.
Once you’re sure the power is off, put on your personal protective equipment (PPE). Safety gloves protect your hands from sharp edges and potential chemical exposure, while safety goggles are essential to shield your eyes from any debris or accidental refrigerant splashes. Do not proceed without this gear.
Step 2: Identify the TXV
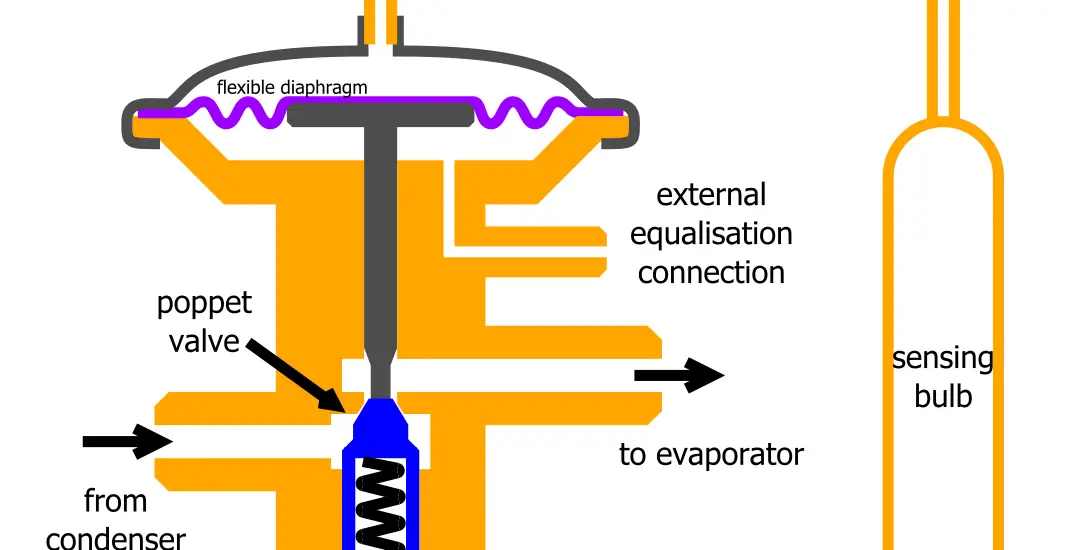
The Thermal Expansion Valve, or TXV, is a critical component that regulates the flow of refrigerant into the evaporator coil. It’s typically a metal valve connected to two pipes.
To locate it, you’ll have to trace the piping back from the evaporator coil toward the compressor unit. The TXV is generally located near the evaporator coil and often has a sensing bulb attached to it. This bulb is clamped to the suction line and it’s a key part of how the TXV functions.
Take your time to correctly identify this component before moving on.
Step 3: Attach the Pressure Gauge
Next, you’ll need to measure the refrigerant pressure in the system, and for that, a pressure gauge is essential. Locate the low-side service port, which is generally marked with a blue cap.
Remove the cap and attach the pressure gauge securely, ensuring there are no leaks. This gauge will allow you to monitor real-time pressure levels, providing key data you’ll need for adjusting the TXV properly.
Check out these other related articles…
Thermostatic Expansion Valve Working Principle: Easy Guide
Car AC Expansion Valve Noise: Easy Diagnosis & Repair
Expansion Valve Hissing Noise: 4 Steps to Diagnose & Fix
Expansion Valve Equalizer Line: The Ultimate Guide
Expansion Valve Icing Up: Fixed in 5 Easy Steps
Step 4: Measure Initial Superheat
Before making any adjustments to the TXV, you’ll need to establish a baseline by measuring the existing superheat. Attach a temperature probe to the suction line near the evaporator coil. Note down the temperature reading.
Now, check the pressure reading on your attached pressure gauge. Use a Pressure-Temperature (PT) chart to convert this pressure into its corresponding saturation temperature for the refrigerant you’re using.
Finally, subtract this saturation temperature from the temperature of the suction line to calculate the existing superheat. Write this number down; it’s your baseline for adjustments.
Step 5: Adjusting the TXV
Armed with your baseline superheat reading, you’re ready to adjust the TXV.
Locate the adjustment stem on the TXV; it’s usually a bolt-like piece that can be turned with an adjustable wrench.
Turning the stem clockwise will increase the superheat level, meaning the system will work harder but may be more stable.
Turning it counterclockwise will decrease the superheat, potentially making your system more efficient but possibly less stable.
Make small adjustments, about a quarter-turn at a time, and always wait for the system to stabilize before making further changes. This usually takes about 15-20 minutes.
Step 6: Confirming Adjustments
After making an adjustment and waiting for the system to stabilize, it’s time to check if your adjustment was successful.
Reattach the temperature probe to the suction line and record the new temperature. Recalculate the superheat by once again subtracting the saturation temperature (derived from the pressure gauge and PT chart) from the suction line temperature.
If the superheat level is now within the target range, you’ve successfully adjusted the TXV. If not, you may need to go back to Step 5 and make additional adjustments.
Why Adjusting TXV Superheat is Important
Adjusting TXV superheat is not just for experts; it’s a maintenance task that can benefit any system. Proper superheat adjustment ensures that your air conditioning or refrigeration system is cooling effectively while minimizing energy consumption. When correctly set, superheat can also extend the lifespan of your system’s compressor, making this a task worth your time and attention.