If you’re dealing with refrigeration or air conditioning issues, understanding how to make a TXV adjustment clockwise is crucial. This step-by-step guide is here to make the process smooth and stress-free for you, even if you’re not a technical expert.
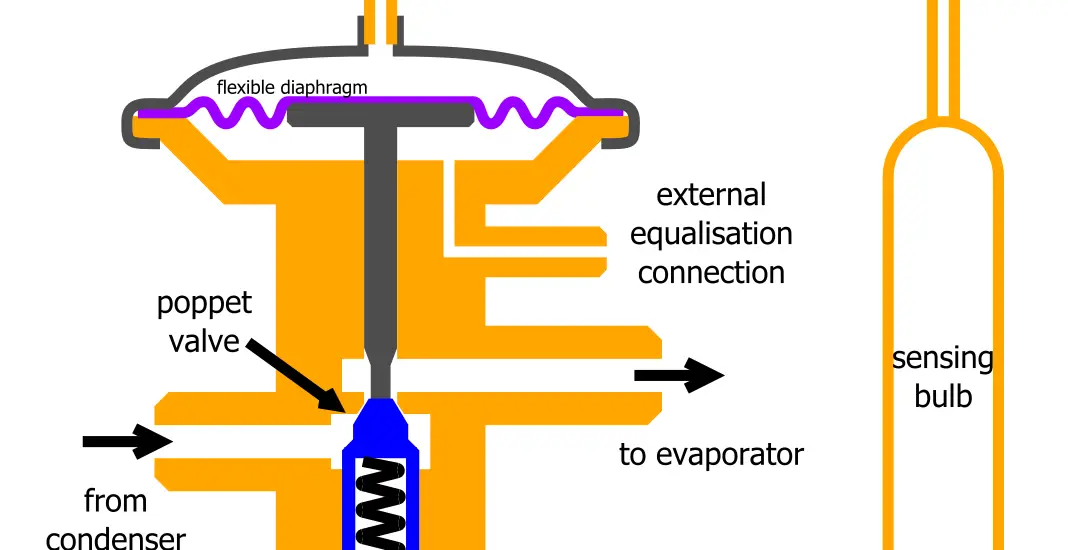
Table of Contents
Tools Needed for TXV Adjustment Clockwise
Before you dive into the process, you’ll need to have the right tools at hand. These are:
Adjustable Wrench: For turning the TXV stem. (e.g. this Crescent 4″ Adjustable Black Oxide Wrench on Amazon.)
Screwdriver: Possibly needed to remove any housing or covers.
Thermometer: To measure superheat levels. (You can use this KIZEN Infrared Thermometer Gun listed on Amazon.)
Gloves: For safety, to protect your hands.
Safety Goggles: To protect your eyes from any accidental refrigerant spray.
Safety Precautions
Before you begin to make TXV adjustment clockwise, safety is paramount. Take the following precautions:
Turn off the power: Always turn off the electrical supply to the unit to prevent accidents.
Wear Safety Gear: Put on your gloves and safety goggles before starting.
Consult Manufacturer’s Manual: Make sure you are following all guidelines and warnings provided by the manufacturer.
Check out these other related articles…
Car AC Expansion Valve Noise: Easy Diagnosis & Repair
Expansion Valve Hissing Noise: 4 Steps to Diagnose & Fix
Expansion Valve Equalizer Line: The Ultimate Guide
Expansion Valve Icing Up: Fixed in 5 Easy Steps
How to Adjust Expansion Valve in 6 Easy Steps
Step-By-Step TXV Adjustment Clockwise
The TVX adjustment clockwise can be performed by following these steps:
Step 1: Locate the TXV
Finding the Thermostatic Expansion Valve (TXV) is your first step. Usually, the TXV is positioned near the evaporator coil within the indoor unit, often referred to as the air handler.
You can locate the evaporator coil by opening the access panel on the air handler unit. This may require a screwdriver, depending on the specific design of your air handler.
Once the panel is open, look for a device connected to the refrigerant lines; it should have a rotational stem. This is the TXV.
Step 2: Measure Initial Superheat
Superheat refers to the amount by which the vaporized refrigerant is above its saturation temperature (boiling point) at a given pressure. It’s crucial to measure the existing level of superheat before making any adjustments to understand the impact of your changes later.
Use a thermometer to measure the temperature of the refrigerant vapor at the outlet of the evaporator coil. Make a note of this temperature; you’ll need to compare it with a new reading after making adjustments.
Step 3: Make the Adjustment
After measuring the initial superheat and noting it down, you can now proceed to adjust the TXV. Use your adjustable wrench to gently hold the stem of the TXV. Turn this stem clockwise to increase the superheat level.
It’s important to be cautious; even a quarter-turn can have a substantial impact on superheat levels. Start with a minimal adjustment, say a quarter or half a turn, and then wait to measure the effect.
Step 4: Measure the Superheat Again
After making an adjustment, don’t rush to measure the superheat immediately. The system needs time to stabilize to show the true effect of your adjustment. Wait for approximately 15 to 20 minutes for the system to reach a stable state.
Using the same thermometer, measure the temperature at the evaporator outlet again. Compare this new reading with your initial reading to see if the superheat level has increased, which was the aim of adjusting the TXV clockwise.
Step 5: Test System
Having adjusted the TXV and verified its effect on superheat, the final step is to test the system’s overall performance. Turn the power back on and let the system run for at least 30 minutes. Feel the air from the vents to assess if it’s cooler than before.
If the adjustment is successful, you’ll experience a noticeable improvement in cooling performance. However, if there’s no change or if the cooling has become less efficient, you may need to re-adjust the TXV, either by making another small clockwise adjustment or by turning it counter-clockwise to return to the original setting.
Why Does the TXV Need Adjustment?
A Thermostatic Expansion Valve (TXV) is a critical component in refrigeration and air conditioning systems. Its job is to manage how much refrigerant flows into the evaporator coil. The TXV does this by widening or narrowing an internal orifice, in response to temperature changes.
If your system is not cooling as efficiently as it should, adjusting the TXV may help. Turning the adjustment stem clockwise will generally increase the superheat, which can lead to a cooler environment.
