There are several reasons that your fridge may have stopped cooling, and a faulty compressor may be one of them. However, at this point, we assume that the reason you need to learn how to replace a refrigerator compressor is that you want to replace one that you are very sure has gone bad.
Nonetheless, one of the effects of a faulty compressor is that it will affect the cooling function of a fridge and lead to food spoilage. And the longer your fridge’s compressor stays unreplaced, the easier it is for you to lose food items because they are not being preserved properly.
However, just in case you are not fully sure that your fridge’s compressor is faulty, we’ll gladly let you in on this.
How to Know When Your Refrigerator’s Compressor is Faulty and Needs to be Replaced
The compressor noise is the most common indicator of a faulty compressor.
Fridges usually make a low near-quiet hum. That’s the sound that shows that the compressor is working. If you haven’t heard the sound in a few days, it means your compressor may be faulty.
You may want to pull your refrigerator away from the wall and place your ear close to it. If you hear a silent humming but your fridge is warm, then something may be bad.
Also, if you hear no sound at all, then it is very likely that your refrigerator compressor is not working well.
By the way, if your fridge makes noise unusually, then there are a number of things that may be wrong other than a faulty compressor.
Not to worry, this article provides likely reasons why your refrigerator is making noise as well as troubleshooting tips to deal with it.
That being said, just before we dive into how to replace a compressor, we should mention at this point that changing a compressor is not as easy as changing a light bulb. What’s more? It comes with some safety risks.
So, we recommend protective clothing when you replace a refrigerator compressor.
In fact, except you are an experienced technician, we advise you to call an expert to make the change for you.
Meanwhile, sometimes, your compressor may not even be faulty and may only need a hard start; which is where a start kit like the one below will be useful.
[amalinkspro type=”cta-btn-css” ctabtn-id=”” asin=”B008YDSH6E” apilink=”https://www.amazon.com/dp/B008YDSH6E?tag=refrigeratorsreviewed-20&linkCode=osi&th=1&psc=1″ addtocart=”false” new-window=”true” nofollow=”true” alignment=”alignright”]Click here to get the Supco RCO410 Start Kit on Amazon[/amalinkspro]
How to Replace a Refrigerator Compressor
The steps involved in replacing your refrigerator compressor are divided into two main stages – the preparation and installation stages.
Preparation Stage
- Unplug the refrigerator from the wall
Before you begin to touch anything on your refrigerator, you want to be sure that it is not plugged into a power source.
So, we recommend unplugging it from the socket completely.
Once that’s out of the way, proceed to empty the fridge of its contents. You can transfer the perishable ones into a cooler filled with ice, an icebox, or another refrigerator.
- Locate your compressor
Your compressor can be accessed from the back unit of your refrigerator.
So, after pulling the fridge away from the wall, unscrew the back panel.
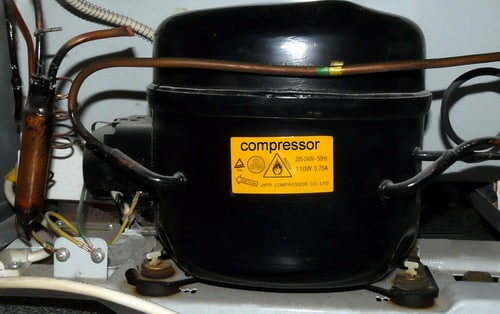
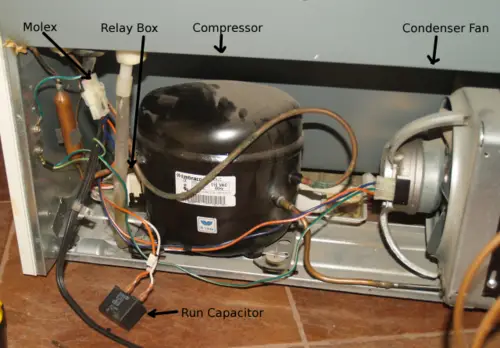
The compressor is somewhere around the bottom and has a cylindrical shape.
Typically, accessing the compressor may not be so easy at first blush because it is usually protected with a metal guard.
Removing the metal guard will grant you access to the compressor.
- Remove the old compressor
Check around the compressor area to know if it has a capacitor. The capacitor of a compressor is a large box that provides starting power to the compressor. Remember that when the compressor doesn’t start, starter kits like the SUPCO kit that we recommended earlier can be used to provide starting power to the compressor.
Still on preparing the compressor to be replaced, after you locate it, remove the wiring connecting the compressor to the capacitor.
By now you should have the new compressor to replace the old one with.
We should let you know beforehand, especially if you haven’t gotten a new compressor yet that compressors tend to be quite pricey. In fact, more often than not, the cost of a new compressor may be sufficient to get a new refrigerator altogether.
More so, a new fridge is not likely to give you problems anytime soon like an old fridge with a new compressor will.
But if you insist, we will gladly guide you through the installation stages…

Installation Stage
- Reconnect the capacitor
Following the wiring code provided by the refrigerator manufacturer, attach the wires on the capacitor to the new compressor.
- Get the refrigerant
Without a refrigerant, your compressor won’t function well. The type of refrigerant you’ll need varies depending on how old the unit is.
If your refrigerator is a newer unit, you’ll probably need the R-404c refrigerant (except the manufacturer says otherwise). But if it’s an old unit, you’ll need R-22 refrigerant.
To add a refrigerant, follow all the instructions provided by the manufacturer of the refrigerator.
Also, ensure that the compressor is not leaking the refrigerant when you’re transferring it.
Keep yourself protected by wearing cover shoes, safety gloves, and other protective gear. This is because the refrigerant is an ozone-depleting chemical that will damage your skin if it comes in contact with it.
- Connect the refrigerator valves
Once you’ve successfully installed the compressor and filled it with the appropriate refrigerant, connect the valves on the refrigerator to the compressor.
Don’t use any wiring diagram you see online to connect the valves.
This is because every refrigerator comes with its unique wiring diagram. So, we recommend that you follow the one provided by the refrigerator manufacturer.
- Check if it works!
Return the compressor guard and screw it shut. If the refrigerator has an extra back panel, also screw it back in place. Then, plug your refrigerator into the AC outlet and check if your compressor installation was successful.
Need a visual step-wise guide on how to replace a fridge compressor? Then check out the video below for detailed and expert tips on how to.
Check out these other in-depth articles/reviews…
Garage Refrigerators: How to Buy the Best
Allavino FlexCount 56-Bottle Wine Cooler
Costway 55-Quart 12V Refrigerator with Freezer — Detailed Review
Koolatron 33-Quart Kargo 12V Cooler/Warmer — Extensive Review
Ivation 18-Bottle Dual Zone Wine Cooler — Detailed Review
Nutrichef 18-Bottle Wine Cooler with Handle — Extensive Review
How To Replace A Refrigerator Compressor — Bottom Line
Replacing a refrigerator compressor is certainly not a walk in the park!
This is why expert service is often recommended. Not just because the process is quite tedious but because there are safety risks involved.
All that being said, replacing a faulty compressor will extend the number of years on a fridge. However, if after doing the cost analysis of replacing a fridge’s compressor you realize that it costs almost the same price as a new fridge, then we advise you to get a new fridge instead.
We have also reviewed some highly-rated mini and compact fridges as well as wine coolers and beverage centers that you may want to check out.
Get Instant Help — Ask An Experienced Verified Appliance Technician
Need expert help? Click here to use the chat box on this page to speak with a verified appliance technician right away. No need for expensive in-home service calls. No appointments. No waiting.

Pingback: How Much Does Refrigerator Repair Cost? - In-depth Refrigerators Reviews
Pingback: How Much Does It Cost to Replace a Refrigerator Compressor - In-depth Refrigerators Reviews
Pingback: How to Defrost Samsung Refrigerator - In-depth Refrigerators Reviews
Pingback: Why Your Refrigerator is Making Noise - Reasons and Troubleshooting Tips - In-depth Refrigerators Reviews