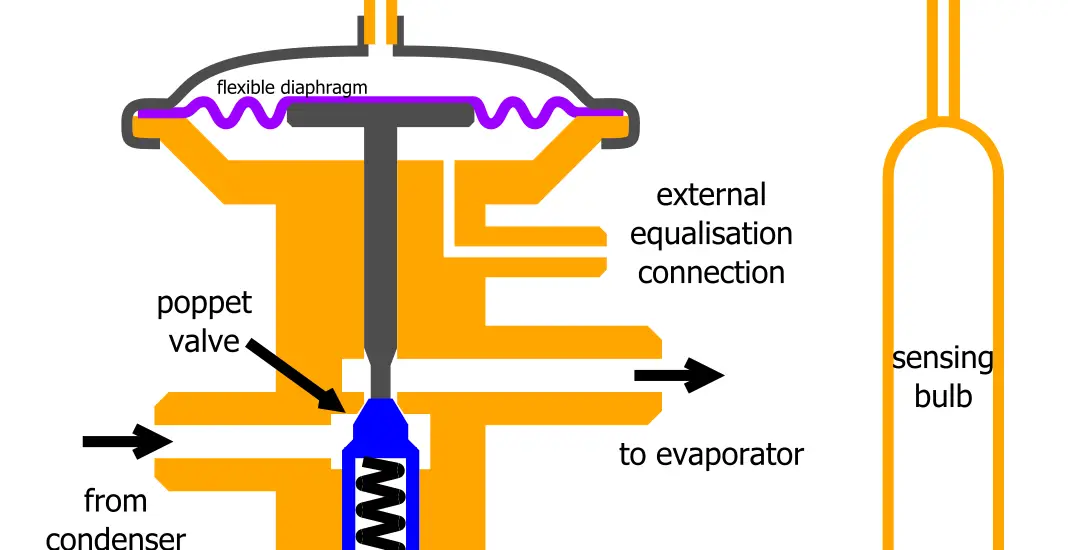
Understanding how to perform a Danfoss expansion valve adjustment is essential for the optimal functioning of your refrigeration or air conditioning system. Whether you’re a certified technician or just a determined DIY enthusiast, this comprehensive guide is designed to walk you through every single step of the adjustment process.

Table of Contents
Tools Needed for Danfoss Expansion Valve Adjustment
Before embarking on the Danfoss expansion valve adjustment journey, make sure you have the following tools at hand:
Screwdriver: Usually a flathead is used for turning the adjustment screw. (6PCS Magnetic Tip Screwdriver Set on Amazon)
Adjustable Wrench: Necessary for loosening and tightening the adjustment nut. (Crescent 4″ Adjustable Black Oxide Wrench listed on Amazon)
Pressure Gauge: To measure the current refrigerant pressure pressure before and after adjustment. (Yellow Jacket 40345 Blue Single Test Pressure Gauge on Amazon)
Thermometer: To assess the temperature of the evaporator and surrounding area.
Danfoss Expansion Valve Adjustment: Step-by-Step Guide
Before embarking on the Danfoss expansion valve adjustment, ensure you have switched off the power supply to the system for your safety. Here’s a detailed guide:
Locate the Expansion Valve
This valve is generally located near the evaporator coil. If you’re having difficulty finding it, consult your system’s user manual for a labeled diagram.
Check Current Pressure and Temperature
Use a pressure gauge to measure the refrigerant pressure and a thermometer to measure the temperature near the evaporator. Document these readings as they will serve as your baseline for adjustments.
Loosen the Adjustment Nut
The adjustment screw is typically held in place by a hexagonal nut. Use your adjustable wrench to carefully loosen this nut; you don’t have to remove it entirely.
Adjust the Valve
Using your flathead screwdriver, turn the adjustment screw. If you turn it clockwise, you’re reducing the refrigerant flow; turning it anticlockwise increases it. Perform this task slowly, making small adjustments and waiting a couple of minutes between each to allow the system to stabilize.
Recheck Pressure and Temperature
After making your adjustments, use your pressure gauge and thermometer to check the new readings. Compare these to the manufacturer’s recommended specifications, which you can find in the user manual.
Secure the Adjustment Nut and Restore Power
If the new readings are within acceptable ranges, tighten the adjustment nut using your wrench. Finally, turn the power back on, and monitor the system to ensure it’s functioning as expected.
Common Troubleshooting Tips
If the system still isn’t performing up to your expectations even after the Danfoss expansion valve adjustment, don’t worry. Here are some tips:
Check for Refrigerant Leaks: Leaks are the most common cause of pressure issues. Check all joints, seals, and connections for evidence of leakage. A soapy water solution applied to the joints can help identify leaks as it will bubble where gas escapes.
Inspect for Blockages: A blocked refrigerant line will affect the pressure and cooling efficiency. Use a specialized refrigerant line cleaner or consult a professional for this task.
Consult the Manufacturer’s Manual: Often, the user manual or guide will have specific troubleshooting tips. This will be your most reliable source for system-specific issues and may offer solutions you haven’t considered.
Check out these other related articles…
Expansion Valve Hissing Noise: 4 Steps to Diagnose & Fix
Expansion Valve Equalizer Line: The Ultimate Guide
Expansion Valve Icing Up: Fixed in 5 Easy Steps
How to Adjust Expansion Valve in 6 Easy Steps
How to Adjust Car AC Expansion Valve in 8 Easy Steps
Why You Need to Perform Danfoss Expansion Valve Adjustment
Adjusting the Danfoss expansion valve is not a mere whim; it’s a necessity for several critical reasons. Let’s delve into why this adjustment is so crucial:
Maintain Efficiency: The efficiency of your refrigeration or air conditioning system is directly tied to how well the expansion valve regulates the refrigerant. An improperly adjusted valve can waste energy, causing your electricity bills to spike. The valve needs to allow just the right amount of refrigerant into the evaporator coil for optimal cooling.
Prevent Overheating and System Damage: Incorrect valve settings can make your compressor work harder than it should. Over time, this excessive workload can lead to overheating and severe damage to the compressor, a crucial and expensive component of your system.
Optimal Cooling: If the valve is too open or too closed, it will either flood the evaporator with too much refrigerant or starve it, leading to inefficient cooling. Proper adjustment ensures that your system cools the space effectively and according to its specifications.