The LG refrigerator smart diagnosis is a component of the SmartThinQ app which is used for a faster, easier, and remote detection of issues.
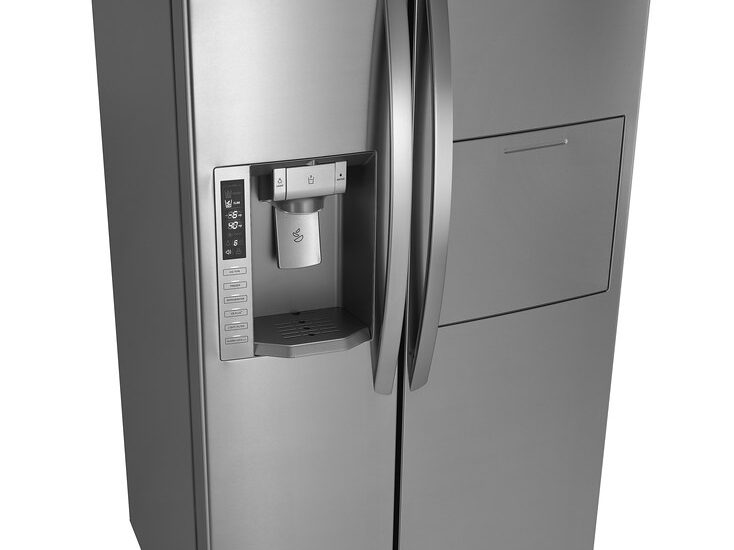
Table of Contents
How to Use Smart Diagnosis on LG Refrigerator
You can effectively use the smart diagnosis by following the steps below:
Step 1
Click on the SmartThinQ App on your phone. Of course, you must have registered your refrigerator to LG.
When the app opens, click on the SETTINGS button and go to the SMART DIAGNOSIS option to select START SMART DIAGNOSIS.
Step 2
On your refrigerator, click on the LOCK button and hold it for about three seconds to lock the control panel.
Step 3
Open the right refrigerator door and locate the smart diagnosis logo near the top-right hinge of the refrigerator. Place the mouthpiece of your phone very close to the logo; that is where your refrigerator’s speaker is.
Next, touch the RECORD option on your SmartThinQ App to commence recording. Also, quickly click on the START button on the refrigerator’s display. A sound from your phone notifies you that the refrigerator is carrying out an analysis. Once it is done, a chime will sound.
Step 4
You may now withdraw your phone from the refrigerator’s speaker, check the result of the analysis, and the suggested resolutions. If the resolutions are not what you can do yourself, you may send the information to the LG Help Centre for professional assistance.
Let us look at another way to use the Smart Diagnosis:
To begin, follow the aforementioned steps 1,2, and 3.
Step 4
Click and hold the FREEZER button for about 3 seconds while still holding your phone’s mouthpiece next to the refrigerator’s speaker.
Step 5
There’ll be a sound, and the control panel will count down from 3 to 1. A tone transmission will follow this. At the end of the tone transmission, the control panel will inform you by indicating END on its display.
Step 6
You may withdraw your phone from the refrigerator’s speaker at this point. Then, contact LG using the phone number displayed on the screen and speak with a customer service representative to assess the diagnosis’ result.
To use your smartphone to perform the diagnosis, open the SmartThinQ app, click on the SMART DIAGNOSIS and select WIFI DIAGNOSIS. The results of the diagnosis will appear on your phone once it is completed.
From the results, you’ll determine if the issues are what you can resolve yourself. If you can’t, consult the nearest LG Service Centre.
This article is a more in-depth explanation of how to use the smart diagnosis in an LG refrigerator.
Check out these other articles…
Kenmore Fridge Filter [Issues & Solutions]
Kenmore Refrigerator Modes [Detailed Guide]
Refrigerator Compressor Is Hot [Solutions]
Refrigerator Compressor Running Problems [Solved]
Refrigerator Compressor Noise [Solutions]
LG Refrigerator Smart Diagnosis Codes
These are codes that indicate errors or faults on specific parts of the refrigerator and appear on the display of the refrigerator:
1. Er 15 or Er IS
This error code indicates that the ice maker fan or sensor is either faulty or not connected. To resolve it, ensure a proper connection between the ice maker motor and the control panel. You may also check the connection between the ice maker sensor and the control panel.
If these actions do not resolve the issue, you may need to test these parts to determine which is faulty and may require a replacement.
2. Er 67
When you see this error code, it is an indication that the refrigerator door doesn’t shut well. To resolve this, check the door seal for proper sealing. Then, inspect the door and cabinet frames to ensure nothing is stuck on any of them. Also, ensure that the drawers are well shut.
3. Er 22
The code signifies a bad compressor relay. The only way to fix a bad or burnt compressor relay is to replace it.
4. OF F
The code shows the refrigerator is in DISPLAY or DEMO mode. The mode ensures that the refrigerator does not cool while it is still connected to power. To deactivate the demo mode, take the following steps:
Open any of the refrigerator doors.
On the display panel, click and hold the ICE PLUS and REFRIGERATOR buttons at the same time for about 5 seconds or until the refrigerator makes a beep.
The temperature indicator will come on, and the DEMO mode will deactivate.
5. Er CF
The code indicates a faulty condenser fan. Either the control panel has stopped getting feedback from the condenser, or the feedback period is less than 65 seconds while the fan operates.
To troubleshoot this, ensure that the power control board, condenser fan, wiring harness, and condenser fan motor are in good working condition. You may need to use a multimeter to run a test on the parts. If any is faulty, replace the faulty one.
6. Er dH
The code shows a faulty defrost system. If the defrost heater fails, the error code appears after an hour.
To fix this, disconnect the refrigerator from power and reconnect after 5 minutes. Allow the refrigerator to run another defrost cycle. If the problem continues, you may have to look at the control board, defrost heater, the controller relay, and the controller assembly.
You’ll need a multimeter to check the components. But if you cannot run the tests, contact LG or hire a qualified technician.
7. Er CO or Er Co
The code shows a faulty control board. The board is a small central-control computer in the refrigerator from which electronic control messages are generated and sent through electric wires to different parts of the refrigerator.
To fix this error, ensure the wire between the control board and the display panel isn’t disconnected or bad. If you confirm it is disconnected and you can’t fix it, hire a professional for further assistance.
8. Er d5 or Er dS
This code indicates that the defrost sensor is faulty and needs to be replaced.
9. F dS
The freezer sensor is faulty and needs a replacement.
10. R dS
The refrigerator sensor is defective and needs to be replaced.
11. Er FS or Er F5
This code shows that there is a connection problem between the freezer sensor and the control board. With a multimeter, check for continuity in these parts. If there is no continuity, replace the defective ones.
12. Er H5 or Er HS
This error indicates that the humidity sensor no longer sends data to the central control panel. The humidity sensor regulates the moisture and temperature level of the refrigerator.
To fix this, ensure a proper connection in the wiring between the control panel and the humidity sensor. Check the continuity of the sensor and if it has no continuity, replace the sensor.
13. Er FF
The code means there is a faulty ice maker fan or freezer fan. Excessive ice buildup could make a freezer fan malfunction.
To ensure the freezer door shuts well, check if the door gasket is broken or damaged. If it is, replace it. Also, check to confirm that your refrigerator is level according to your refrigerator’s manual. If the refrigerator isn’t level, it will keep the doors from sealing tightly.
In addition, check the door hinges to see whether or not they are tight. This is particularly needed if you recently removed the door or newly installed the unit.
If you find no fault with the gasket, leveling, and hinges, run a continuity test on the freezer fan to check for continuity. Replace the fan if there is no continuity.
14. Er gF or Er 9F
Low water pressure or a malfunctioning flow sensor causes the code to appear. To fix this, observe the ice maker and see if it takes longer than usual to produce ice. If it does, increase the water flow to the refrigerator.
Also, check to confirm that the ice maker isn’t overflowing or too full. If it is, the flow sensor is faulty and should be replaced.
Recognizing these codes will help to detect the faulty parts of an LG refrigerator quickly. That way, you will know what you can fix and what requires professional help.
Get Instant Help — Ask An Experienced Verified Appliance Technician
Need expert help? Click here to use the chat box on this page to speak with a verified appliance technician right away. No need for expensive in-home service calls. No appointments. No waiting.