If you are looking for how to fix the problem of a Samsung ice maker having too much ice, this article discusses the solution in detail.
Table of Contents
Samsung Ice Maker Too Much Ice – Solutions
Samsung Ice Maker Has Too Much Ice
Here are things to check if the ice maker in your Samsung refrigerator has too much ice:
1. Ice Maker Compartment
Seal the compartment or room where the ice maker sits with Epoxy, starting from the bottom left and running it to the back of the compartment. Even if you are not sure about the compartment having a leak, doing this seals any leak or prevents any future one.
A leak in the room or compartment lets in warm air, which makes it easy for water around the ice maker to freeze in place. But Epoxy fixes the issue as long as it is certified safe by the FDA.
2. Ice Bucket Gasket
If the gasket around the front of the ice bucket is weak, loose damaged, replace it immediately. If you are not sure how to determine if it is damaged, try pulling it from the ice bucket. This is usually stiff and hard. So if it comes off easily, it means it is weak.
A weak gasket makes it easy for air to enter, causing condensation and freezing around the ice maker.
3. Fan Motor
Defrost the unit manually if there is ice around the motor of the ice maker fan. Simply empty the unit of all food items, unplug it, leave the door open and give it time to thaw. Be sure to place towels around the unit to catch dripping water.
However, check the components of the defrost system to determine which of them has failed. Ice should not build up around the fan if the system is working fine. So if this happens, something is wrong with the system.
Additionally, check the motor of the fan for continuity if it is not frozen. The motor could have failed, causing the fan not to work and leading to a buildup of ice around the ice maker, though this is rare. Replace the motor or fan if there is no continuity.
4. Ice Route Flap
Take a look at the black flap that covers the ice route from where ice passes through to the dispenser. The flap should rest snugly against the housing. If it is not, check to see if any piece of ice or other debris is keeping it open. Remove the piece and close the flap properly.
In addition, pour warm water down the route or chute to make double sure no piece of ice is stuck anywhere around the flap.
Warm air can pass through the smallest opening in the flap and enter the ice maker, causing freezing. Therefore, ensure the flap always rests flush against the housing.
5. Air Duct
Check to see if ice has blocked the air duct which is above the evaporator coils. If this is so, melt the ice with a safe heat source such as a hair dryer, being careful not to overheat any plastic. You can also defrost the unit manually to thaw the ice.
6. Water Inlet Valve and Water Line
Ensure that the valve and water line are tightened so that they don’t leak water around the ice maker or cause a splashback. The water from the line or valve will freeze around the ice maker if this happens.
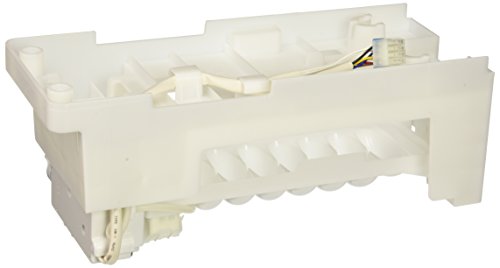
7. Ice Maker
A defective or damaged ice maker can cause ice to build up around it. If it has cracks, warm, moisture-laden air will enter easily and lead to the freezing of water around it.
So when every other fix fails, replace the ice maker assembly, making sure to connect the water line and valve correctly.
[amalinkspro type=”cta-btn-css” ctabtn-id=”” asin=”” apilink=”https://www.amazon.com/dp/B00307ZA7I?tag=refrigeratorsreviewed-20&linkCode=osi&th=1&psc=1″ addtocart=”false” new-window=”true” nofollow=”true” alignment=”alignright”]Buy this ice maker on Amazon[/amalinkspro]
Samsung Ice Maker Making Too Much Ice
If the ice maker is making too much ice, check the following parts and replace any defective or damaged ones:
1. Ice Level Arm
Check the ice level arm to see if it is in the down position. If it is, it means the ice maker is on so try moving the arm to the up position. If the arm does not move up smoothly and easily but gives some resistance, the arm is malfunctioning. Therefore, replace the arm.
2. Ice Bucket
Ensure that the ice bucket is inserted fully and correctly if the ice maker is making too much ice. This is especially true if the refrigerator is a top-mount model.
If you are not sure about how to do this, consult the user manual for the refrigerator for instructions on correctly inserting the ice bucket.
3. Feeler Paddle
Take a look under the ice maker and you will see the paddle. See if it is frozen in place. If it is, thaw it by unplugging the refrigerator and waiting a little while for the ice to melt. You can leave the door of the unit open in order to speed up the process.
But if the paddle is not frozen, then it could be a problem of lubrication. Oiling it properly will solve it. If you are not sure about doing this correctly, get a professional to help you.
However, if the paddle is simply not working and none of the above is wrong with it, you can replace the paddle and see if it fixes the problem.
Simply unmount the bolt that holds it in place, put a new paddle in the place of the old one, and moun the bolt again to secure it.
4. Water Inlet Valve
If the ice from the ice maker is not as well-formed as it used to be, check the water valve. Test its solenoid with a multimeter to check for continuity and to see if it is getting enough power. If it is damaged, replace the water inlet valve.
But if the solenoid is in good working order, then check the water pressure to be sure it is up to 20psi. Increase the pressure if it is too low; a qualified plumber can fix it for you.
The valve opens for several seconds to let water into the ice maker. If the pressure of the water is too low, the valve is likely not to open or close properly. And if it does not close, it will keep supplying water to the ice maker, thereby increasing the ice which the ice maker makes.
If all of the above does not fix the problem of the ice maker making too much ice, it is time to reset the machine.
Find the test or reset button of the ice maker. Depending on the type of refrigerator you own, the button could be on the side or bottom of the ice maker.
Press the button and hold it until there is an audible chime or the ice maker motor starts torquing. Again, this depends on the type of refrigerator.
Allow the test to run its duration, which is usually about 6 minutes. When there is a second chime or the motor stops torquing, you know the test is over or the ice maker is functioning well.
Testing or resetting the ice maker usually takes care of many issues, minor or major, such as the ice maker making too much ice.
Check out these other articles…
Samsung Refrigerator Problems [How to Fix]
Fisher and Paykel Refrigerator Dispenser Problems [Solutions]
Samsung Refrigerator Freezer Quit [How to Fix]
Samsung Refrigerator Freezing Everything [How to Fix]
Samsung Freezer Too Much Ice – What to Do
Here are a few things to check if a Samsung freezer has too much ice:
1. Door Seal
Pass your hand up and down the edge of the door to see if you can feel cold air coming from inside the freezer. This will tell you if you need to replace the seal.
Alternatively, close the door of the freezer on a dollar bill or a piece of paper. Next, see if you can remove the bill or paper without opening the door. Replace the seal if you can because it is weak.
This is probably the commonest reason for too much ice in a freezer. A weak seal lets in warm air, laden with moisture. The moisture freezes and over time leads to too much ice in the freezer.
2. Hinges
If you ever removed the door of the freezer and replaced it, check to see if you aligned the hinges properly. If you didn’t, consult the user manual of the unit to determine how to correctly fix it. Improperly-fixed hinges leave a gap for air to enter into the freezer and lead to ice buildup.
3. Condenser Coils
Clean the condenser coils so that there is no dust or debris left on them unless the coils are within the walls of the freezer. This way, they will be able to function optimally in dissipating heat from the freezer.
Significantly dirty coils cannot remove heat efficiently. Because of this, the freezer will put in extra effort to maintain its cold temperature. The result could be too much ice inside it.
4. Location
Check the ambient temperature of the room where the freezer is kept. If it is too hot or too cold, relocate the freezer to another room where the temperature is better.
Additionally, ensure that the freezer is not in the path of direct sunlight or any other source of heat. This is another reason why the unit will automatically put in work to remain cold. Consequently, it will freeze too much.
However, if it is not possible to relocate the freezer, find a way to shield it from the heat. Apart from contributing to ice buildup, the heat could damage the unit beyond repair.
5. Position
Move the freezer away from the wall behind it a little. This is to give room for air to pass behind it and cool the compressor.
The compressor generates heat that needs to be dissipated. If the freezer is too close to the wall behind it, the heat would store up in the unit, making it hard to cool.
As a result, the unit will work extra to reduce the temperature. This extra work makes the freezer become too cold to the point of building ice.
6. Defrost System
If the freezer is a frost free type or has an automatic defrost system, then test the components of the system. One or more of them have failed, leading to too much ice in the freezer.
To test the defrost heater, which is the likeliest to have failed, check for continuity using a multimeter. If there is no continuity, replace the heater. You will find it around the evaporator coils.
For the defrost thermostat, remove the clip holding it in place and disconnect the wires. Place the thermostat in water, attach a multimeter to it and wait for a reading.
When the water is hot, the multimeter should have an O.L displayed on it and when the water is cold, it should have 0.000 displayed.
If you don’t see this happening, the thermostat is defective and should be replaced.
For the defrost timer, turn it counterclockwise and wait for an audible click as the unit launches into the defrost cycle. Wait 30 minutes for the cycle to run fully and end automatically. If it does not end, it means the timer is malfunctioning and needs to be replaced.
The timer is what takes the system in and out of the defrost cycle. If it is broken, the unit could get stuck in the cooling mode or the defrost mode, causing problems.
Additionally, check the defrost sensor and the defrost control board as any or both of them could be damaged, causing the ice buildup in the freezer.
[amalinkspro type=”showcase” asin=”B079JW2YSK” apilink=”https://www.amazon.com/dp/B079JW2YSK?tag=refrigeratorsreviewed-20&linkCode=osi&th=1&psc=1″ new-window=”true” addtocart=”true” nofollow=”true” sc-id=”6″ imgs=”LargeImage” link-imgs=”false” specs=”” btn-color=”#ff9900″ btn-text=”Buy on Amazon” alignment=”aligncenter” hide-prime=”0″ hide-image=”0″ hide-price=”0″ hide-button=”0″ width=”600″]Samsung DA47-00244U Defrost Heater Assembly[/amalinkspro]
7. Defrost Drain
Open the interior back panel of the freezer to expose the defrost drain. Check to see if there is a sheet of ice over it or if debris is stuck in the drain.
If there is ice, pour hot water slowly but steadily down the drain until all the ice melts and the water runs free and clear.
And if there is debris, clean it out using a stiff wire. Afterwards, pour a mixture of water and bleach down the hole to clear out any remaining debris.
You can also opt to defrost the freezer manually as this will also melt any ice covering the defrost drain.
If the defrost drain is clogged, either with ice or debris, the water from melted ice will not drain but will back up into the freezer, refreeze and form ice.
8. Freezer Content
Hot food brings humidity into the freezer, which contributes to ice or frost buildup. Therefore, avoid putting hot food into the freezer. If you have to store the food, allow it to cool completely or cool somewhat before storing it.
In the same vein, water-rich food introduces additional moisture which freezes and forms ice. This is especially true if the weather is hot and frozen food from the freezer aisle at the store starts to melt before you get home. Therefore, clean the containers in which the food is before putting them in the freezer.
Additionally, avoid leaning any item on the back or side walls of the freezer. Doing this makes it easy for ice or frost to form due to condensation.
9. Dispenser Door
A piece of ice could keep the door or flap of the ice dispenser chute from closing completely. That little opening will let warm air into the freezer and cause ice to build up. Check to see if there is ice stuck on the door. If there is, remove it using a plastic spatula or spoon.
If you find that none of the above measures works for fixing a Samsung freezer with too much ice, it is time to contact Samsung to report the issue and request service.
This is especially needed if the unit is new and is still under an active warranty. Don’t void the warranty by trying to fix the problem yourself.
This video shows practical steps to take if your freezer has too much ice or frost…
Recap
If a Samsung ice maker has too much ice or is making too much ice, it is important to find the cause of the problem and fix it.
However, do note that regular maintenance checks of the ice maker will throw up potential problem points so they can be fixed before they cause any damage.
Therefore, run routine checks on the ice maker in your Samsung refrigerator from time to time. If you are not sure about how to do this, have a certified refrigerator repair agent run the checks regularly.
It is also important to know when to unplug the refrigerator or freezer during routine checks and repairs.
Unless the repair or check needs electric power in order to be performed, unplug the unit from the wall outlet. If you cannot reach the outlet, power down the circuit breaker that controls that part of the house. Doing this prevents accidental electrocution.
Even with power cut off, be aware that some parts of the electrical appliance can retain some electricity. Therefore, touch the different parts carefully. If it is safer to wait a little while for the power to dissipate, do so for the sake of personal safety.
Get Instant Help — Ask An Experienced Verified Appliance Technician
Need expert help? Click here to use the chat box on this page to speak with a verified appliance technician right away. No need for expensive in-home service calls. No appointments. No waiting.