So you found a puddle of water under your refrigerator once and you cleaned it up, but the water keeps coming back! We know how frustrating this can be but take a deep breath, the solution to this problem is not farfetched. In this article, we will give quick but sure solutions to your Bosch refrigerator leaking.

Table of Contents
Bosch Refrigerator Leaking – What to Check
In this section, we list out the parts of your Bosch refrigerator that when faulty can cause your refrigerator to leak. We will also discuss how to troubleshoot these parts and rectify the problem.
1. Water Filter
The first thing to consider if your Bosch refrigerator is leaking water is the water filter. The water filter may be cracked, not properly installed, not compatible with your refrigerator, or it is just simply old.
Take out the water filter by turning it counterclockwise. And then inspect the filter head, if the seal is missing or looks torn the filter should be replaced.
If the filter head is not damaged then the filter was probably not installed properly. Check your user’s manual for how to properly install your water filter.
If the water filter is old or not the correct brand/size for your refrigerator, then replace it. Ensure you replace the water filter after every 6 months as recommended.
This water filter is compatible with the part number: BORPLFTR50

[amalinkspro type=”cta-btn-css” ctabtn-id=”” asin=”” apilink=”https://www.amazon.com/dp/B08CVR6FPH?tag=refrigeratorsreviewed-20&linkCode=osi&th=1&psc=1″ addtocart=”false” new-window=”false” nofollow=”true” alignment=”aligncenter”]Click Here to Buy Yours Now![/amalinkspro]
2. Water Filter Housing
If the water filter is not the cause of the leak, then it may be the filter housing. Take out the water filter and then inspect the filter housing for cracks. If any crack is found in the filter housing then it should be replaced. Follow the steps below to do this.
How to Replace Bosch Refrigerator Water Filter Housing
Do the following steps to replace the water filter housing of your Bosch refrigerator:
Step 1: Unplug the refrigerator and turn off the water supply. Then, adjust the refrigerator away from the wall so the back is accessible.
Step 2: Remove the rear access panel at the back of the refrigerator.
Step 3: Unthread the screws holding the water valve. Also, remove the screws holding the water supply lines.
Step 4: Take out the valve assembly. Next, remove the water lines connected to the water filter housing.
Step 5: Go to the front of the refrigerator and open the door. Remove the water filter.
Step 6: Use a nut driver to remove the screws holding the water filter housing. And then pull out the filter housing.
Step 7: Disconnect the water lines connected to the filter housing so the filter housing is completely free.
Step 8: Install the new filter housing by connecting the water lines to it and screwing it back on.
Step 9: Go to the back of the refrigerator, attach the water lines to the valve. Put the valve in its place and tighten the screws holding it.
Step 10: Finally, put the rear access panel back in its place and adjust the refrigerator to its original position.
3. Defrost Drain
The defrost drain takes the water produced during the defrosting process to the drain pan. The drain can get clogged with food particles and other debris. When this happens, water will overflow the drain and spill out of it.
To rectify this, the drain pan has to be unclogged. Luckily, this can be done in a matter of minutes. Simply do the following:
i. Locate the defrost drain hole inside the refrigerator. The location of the hole is different based on the refrigerator model. However, most models have theirs at the rear end wall of the freezer.
ii. If there are food particles around the hole, clean it off using a damp cloth. Next, put a straight thick wire down the hole to push out the clog.
iii. Finally, use a turkey baster to flush a mixture of hot water and baking soda down the drain until you hear water rushing into the drain pan. This is an indication that the drain is clean and free of clog.
4. Drain Pan
The water melted off during each defrost cycle is sent to the drain pan. Warm air is then blown over the pan to evaporate the water. However, sometimes due to a glitch, the water may not get evaporated and will overflow.
In this case, the drain pan should be removed and manually emptied. However, this may be an indication of a more serious issue so we advise you call a repair technician.
If the drain pan is not overflowing, then it may be cracked, in which case it should be replaced. Also, if you had the pan removed recently then there is a chance you did not reinstall it properly. Simply take out the pan and reinstall it properly to rectify this.
[amalinkspro type=”showcase” asin=”B07X6KM1QT” apilink=”https://www.amazon.com/dp/B07X6KM1QT?tag=refrigeratorsreviewed-20&linkCode=osi&th=1&psc=1″ new-window=”true” addtocart=”true” nofollow=”true” sc-id=”6″ imgs=”LargeImage” link-imgs=”false” specs=”” btn-color=”#ff9900″ btn-text=”Click Here to Buy Yours Now!” alignment=”aligncenter” hide-prime=”0″ hide-image=”0″ hide-price=”0″ hide-button=”0″ width=”600″]Bosch B36CT80SNS 36″ 800 Series French Door Refrigerator with 20.8 cu. ft. Capacity, FarmFresh System, VitaFreshPro, LED Lighting and MultiAirFlow (Stainless Steel)[/amalinkspro]
5. Door Seal
The door seal help to keep moisture out of the refrigerator. However, if the seal gets torn, worn out, or dirty, it may fail to do the job. And this will cause moisture to enter the fridge and then drip down the doors.
To resolve this issue, the door seal has to be replaced and you can do this yourself in a few minutes.
How to Replace Bosch Refrigerator Door Seal
Do the following to replace the door seal of your Bosch refrigerator:
Step one: Open the refrigerator door. With a putty knife or a flat-head screwdriver pry the top corner of the door seal.
Step two: Hold the already removed top corner of the seal and drag the rest of the seal off the track. Ensure there is no remnant of the seal on the track.
Step three: Get the new seal and place it on the track. Make sure you get a seal that is compatible with your refrigerator’s model.
Step four: Work your way around the track and make sure the seal is properly attached to the track.
Step five: Finally, double-check the seal to ensure there is no bumps or fold.
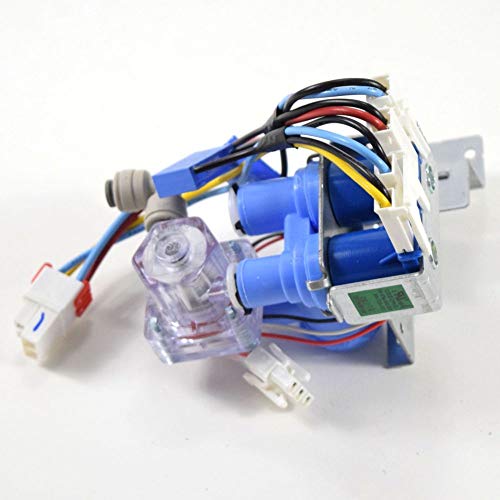
6. Water Inlet Valve
The water inlet valve sends water throughout the refrigerator from the water supply. If the water inlet valve gets defective, it may stay open and drip water under the refrigerator.
The water inlet valve has to be replaced to rectify this issue.
How to Replace Bosch Refrigerator Water Inlet Valve
Replace your Bosch refrigerator water inlet valve by doing the following:
Step one: To prevent electrocution, disconnect the refrigerator from the power source. Also, turn off the water supply.
Step two: Shift the refrigerator from the wall so you will have full access to the back of the appliance.
Step three: Release the locking tabs holding the water line at the back of the refrigerator. Next, unthread the screws holding the rear access panel in place and take it off.
Step four: Locate the water inlet valve. Unthread the screws holding the mounting brackets and take off the valve.
Step five: Disconnect the water lines connected to the inlet valve. The inlet valve should be completely free at this point.
Step six: Install the new inlet valves by reconnecting the water lines to it. And then screw back the mounting bracket.
Step seven: Turn on the refrigerator and the water supply. Then inspect your work and make sure the valve is working properly and not leaking. Finally, put the rear access panel back in its place.
This water inlet valve is compatible with the following Bosch refrigerator models: B26FT80SNS/02, B26FT80SNS/01, B26FT70SNS/01, B26FT70SNS/02, B26FT80SNS/04, B26FT70SNS/03, B26FT80SNS/03, B26FT70SNS/04, B26FT80SNS/06, B26FT70SNS/05, B26FT80SNS/05.
[amalinkspro type=”cta-btn-css” ctabtn-id=”” asin=”” apilink=”https://www.amazon.com/dp/B0713TVVDQ?tag=refrigeratorsreviewed-20&linkCode=osi&th=1&psc=1″ addtocart=”false” new-window=”false” nofollow=”true” alignment=”aligncenter”]Click Here to Buy Yours Now![/amalinkspro]
7. Water Line
Check the water line to see if it is leaking or bent. If it is, then the water line should be replaced as it cannot be repaired.
Watch the video for how to replace the water line of your Bosch refrigerator
Check out these other articles…
Hotpoint Refrigerator Dispenser Problems [Solutions]
Kenmore Refrigerator Leaking [How to Fix]
Samsung Ice Maker Not Working [How to Fix]
Maytag Refrigerator Leaking [Solution]
Thermador Refrigerator Dispenser Problems [Solved]
Kitchenaid Refrigerator Leaking [Solved]
Bosch Refrigerator Water Dispenser Leaking – Why and Solution
The following are the most common potential reasons for your Bosch refrigerator water dispenser leaking and how to solve them:
1. Low Water Pressure
The water inlet valve usually requires between 20-120 psi to shut off properly. The water pressure in your home may be lower than this and so the water inlet valve is constantly dripping.
To check the water pressure, turn off the water supply, remove the water line from the valve and hold it over a bucket. Turn on the water supply and observe the flow of water coming out of the line.
If it is strong then the water pressure is good. But if it is weak, the water line or supply valve may be the cause of the problem and should be replaced.
To replace the water line, simply disconnect it from the dispenser and the water inlet valve.
2. Air is Trapped in the Water Line
Air can get trapped in the water line, especially after a filter change. When this happens, it causes a pressure build-up that results in water dripping out of the dispenser.
To solve the problem, the trapped air has to be released. Simply do the following to release the trapped air:
i. Place a bowl under the dispenser
ii. Hold and release the dispenser trigger after a 5 seconds interval.
iii. Stop doing this after you have dispensed at least 3 gallons of water. The air should be flushed out by the end.
Also, always ensure you do this procedure after each filter change to prevent this problem from reoccurring.
3. The Refrigerator is not Leveled
The front part of the refrigerator is meant to be slightly higher than the rear part. Water may constantly drip out of the water dispenser in a case where the refrigerator is not properly leveled.
Thankfully, leveling the refrigerator is not a big deal and can be done in the following steps:
Step 1: Unthread the screws holding the kick plates in place and take it off. Some models do not have a kick plate, so if yours does not, skip this step.
Step 2: The leveling legs will be visible with the grille removed. To raise the legs, turn the nuts clockwise and counterclockwise to lower them.
Step 3: If reaching the nuts proves difficult, then you may ask someone to help tilt the refrigerator a bit backward. And then adjust the legs to get the required tilt.
Step 4: Finally, use a level to confirm if the refrigerator is properly leveled. And then put the grille back on.
You may read this article for how to solve other dispenser problems of your Bosch refrigerator.
Bosch Refrigerator Ice Maker Leaking Water – Solutions
If water is leaking out of your Bosch refrigerator’s ice maker then try out the following solutions:
1. Unfreeze the Water Supply Tube
The water supply tube connected to the ice maker can get frozen. When this happens, the tube will get blocked and water will spew out of it.
To resolve this, unfreeze the supply tube by heating it. Do this by putting a hairdryer in the lowest setting and heat the tube. Or you may simply defrost the refrigerator. This article is a detailed guide on how to defrost your Bosch refrigerator.
However, note that the water supply tube freezing up is mostly due to a faulty water inlet valve. So, if the tube keeps freezing up, the valve should be checked and replaced if necessary. A section in this article discusses how to replace the inlet valve of your refrigerator.
2. Check the Water Connection
The ice maker may be leaking due to a loose water connection. Check the water line connected to the ice maker and ensure it is properly secured.
3. Unclog the Defrost drain
The defrost drain may be clogged with ice or food particles that causing it to overflow. To resolve this, locate the drain hole and flush a mixture of hot water and baking soda down it.
4. Check and Replace the Ice Maker Assembly
A part of the ice maker assembly may be faulty if the above solutions do not solve the problem. Since the ice maker is sold as an assembly, replacing just the faulty part may not be attainable. Hence, in this case, the ice maker should be replaced.
How to Replace Bosch Refrigerator Ice Maker Assembly
Do the following steps to replace the ice maker assembly of your Bosch refrigerator:
Step 1: Disconnect the refrigerator from the power source. Also, turn off the water supply.
Step 2: Open the refrigerator and remove the ice bin and cover to create more workspace.
Step 3: Unthread the screws holding the ice maker in place. And then, disconnect the harness connected to the ice maker and the refrigerator. The ice maker should be completely free at this point.
Step 4: Take the ice maker to a work table. Now, remove the shut-off arm, the wire harness, and the fill tube holder. To remove the wire harness, press it in and depress the clip to release the harness.
Step 5: Connect the wire harness, the file tube holder, and the shut-off arm to the new ice maker.
Step 6: Take the new ice maker to the refrigerator, reconnect the harness to the ice maker. Remount the ice maker and then screw it back on.
Step 8: Test run the ice maker to ensure it is working properly. Finally, put the ice bin and its cover back in place.
This ice maker replaces parts number AP4483635, AH3482461, 00675261, 1562110, PS3482461, EA3482461, PS8733599

[amalinkspro type=”cta-btn-css” ctabtn-id=”” asin=”” apilink=”https://www.amazon.com/dp/B07RYWBPHR?tag=refrigeratorsreviewed-20&linkCode=osi&th=1&psc=1″ addtocart=”false” new-window=”false” nofollow=”true” alignment=”aligncenter”]Click Here to Buy Yours Now![/amalinkspro]
Get Instant Help — Ask An Experienced Verified Appliance Technician
Need expert help? Click here to use the chat box on this page to speak with a verified appliance technician right away. No need for expensive in-home service calls. No appointments. No waiting.